Introduction
Within SpaceVC, a system template is a base configuration that forms the blueprint of a room, and is intricately tied to the rooms created from them. Below are some important things to remember about a system template in SpaceVC.
- System template configurations are inherited by the rooms created from it. Modifying a system template will result in the room also being modified.
- When the same configuration exists for a system template and a room, the room configuration will take precedence over the system template configuration.
Configuration Options for a SpaceVC Template
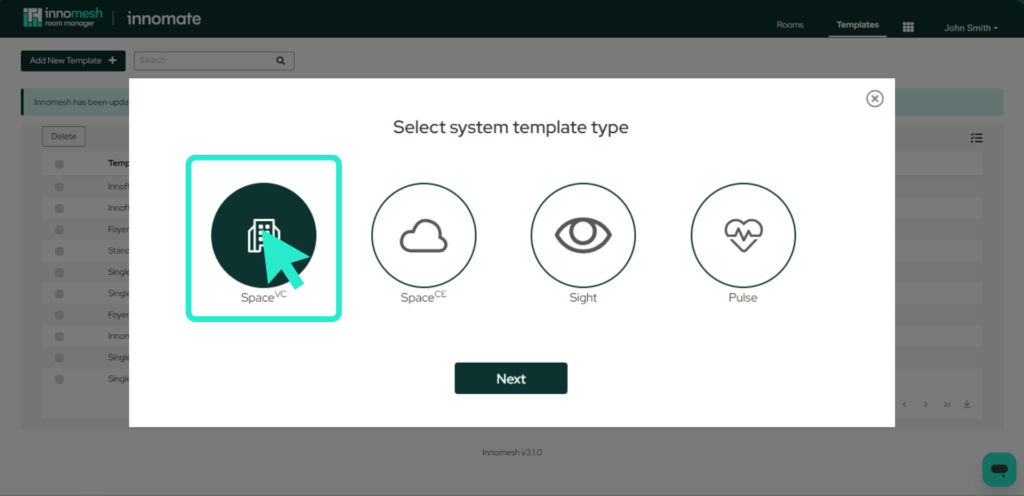
You may access Space VC Template by selecting it via the pop up window as shown below:
The configuration options available for your SpaceVC system template are dependent on the SpaceVC software you are using. However, all SpaceVC templates have the following configuration options:
- Properties
- Devices
- Macros
- Room Options
The section below provides an overview of each of these configuration options.
Properties
The configuration options under “Properties” are general information related to a system template.
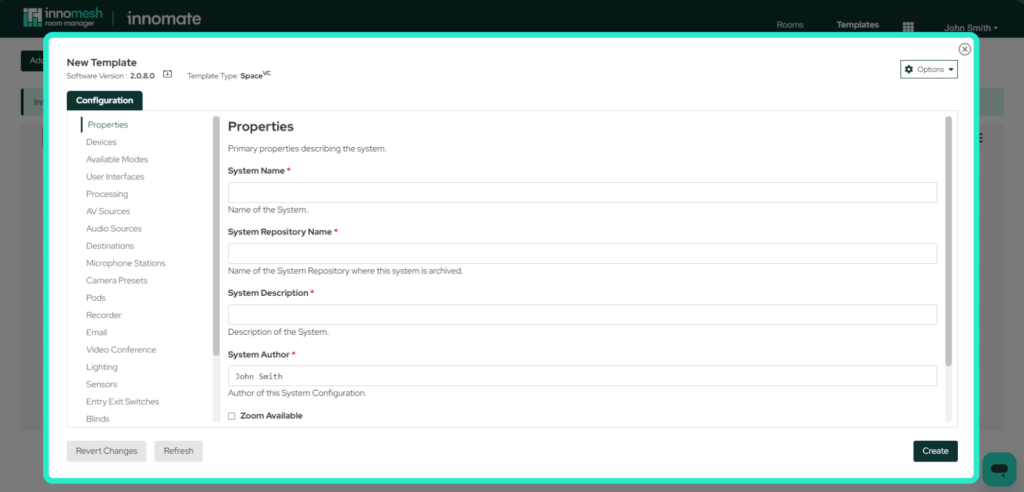
The properties section holds the following high-level values:
System Name
The name of the system type represented by this system configuration.
System Repository Name
This is auto-populated based on the System Name. This is the global identifier of the system template, which is also used as the name for the template archive repository.
System Description
A longer description of the system type represented by this system configuration.
System Author
The author of this system configuration. This is automatically pre-populated with the name of the user creating the template.
System Type
The type of system this configuration represents. The following values represent some of the possible states:
General, Boardroom, Breakout Area, Collaboration Space, Conference Room, Control Room, Exhibition Hall, Foyer, Huddle Space, Laboratory, Lecture Theatre, Meeting Room, Office, Signage, Simulation Room, Stadium, Teaching Space, Tutorial Room.
Template Version
The version number of this template, to track changes over time. The version number must be in the format ‘major.minor.revision’. E.g. 1.0.0.
Is Portable
This marks rooms created with this system template as “portable”, i.e. it is expected that this room will not always be online as part of its normal operation. marking a room as “portable” results in all alerts for the room automatically diverting to the “Suppressed Alerts” tab on the Portal Hotlist. For more information, please refer to this link.
Devices
Main View
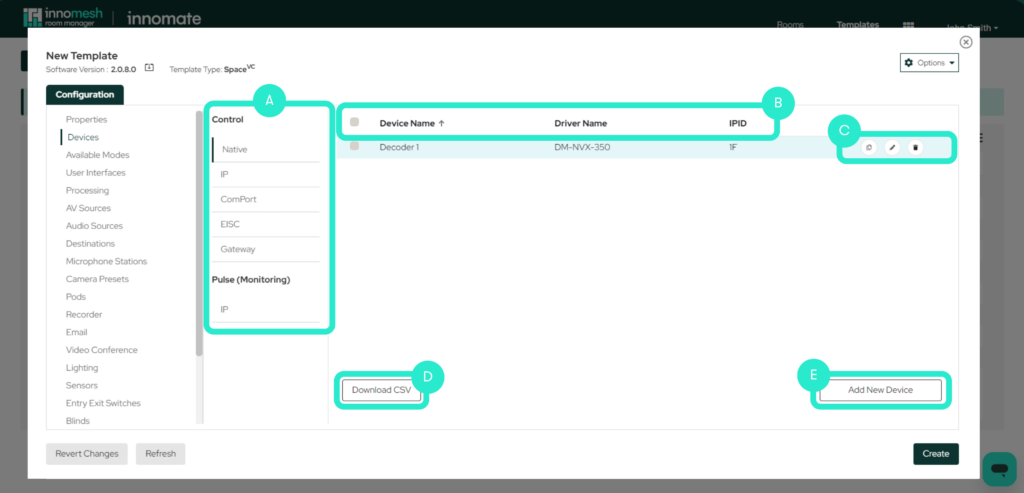
In the main device view we can see 5 primary sections.
A. Types of Device
Devices are separated into 6 categories, selectable on the centre column:
- Native
- IP
- ComPort
- EISC
- Gateway
- Cresnet
Pulse (Monitoring) can be included in this template.
Note that depending on your SpaceVC software, not all categories may be present.
B. Device Fields
Fields which describe the key properties of a device, such as name, control driver name, IP address, etc.
C. Duplicate, Edit and Delete
These allow a device to be duplicated, edited and deleted. The Edit button in particular will take users to a detailed view of the device, allowing for further customisation if required.
D. Download as CSV File
This button download the current list of devices in this category as a CSV file.
E. Add New Device
This button allows the user to add a new device of the selected category.
“Add New Device” View
When adding a new device, the following fields are presented.
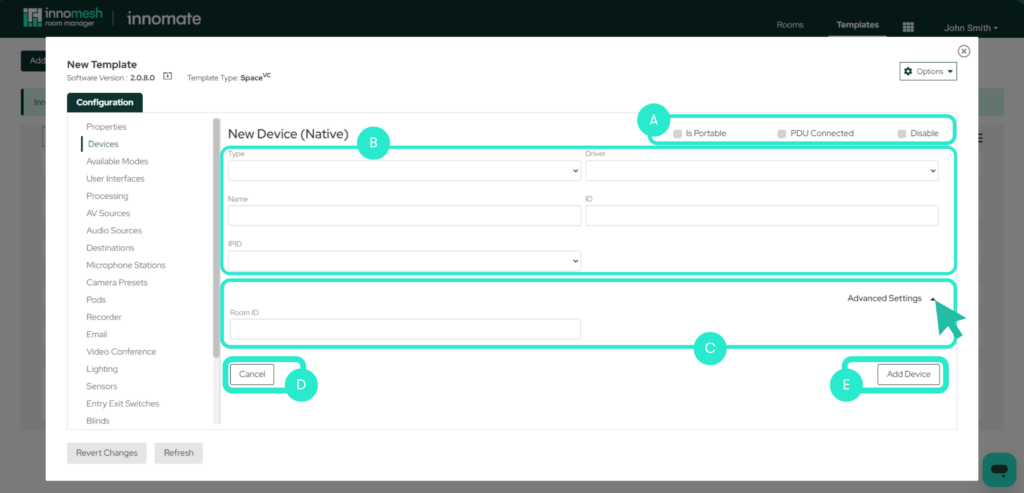
A. Is Portable, PDU Connected & Disable
Is Portable
If checked, alerts from this device will be diverted to the “Suppressed” alerts list on the Innomesh Portal Hotlist. This featured can be used if the device is portable and is not always connected i.e. a display on a removable trolley.
PDU Connected
This denotes that the device is connected to a power distribution unit (PDU), and only turns on while the room is powered on. If checked, alerts from this device be diverted to the “Suppressed” alerts list on the Innomesh Portal Hotlist while the room is powered off.
Disable
If this button is checked, the device will be disabled from the configuration.
B. Standard Fields
Fields which describe the key components of a device.
C. Advanced Settings
This is an expandable menu which shows advanced connection settings relevant for this device type. It is hidden by default.
D. Cancel
This undoes all changes made to this device configuration and returns you to the Device main view page.
E. Add Device
Once all of the required fields are input, this adds the device to the template configuration.
Common Elements to all Device Types
As previously mentioned, each type of device will have different fields which the user must enter.
ID
The unique identifier for the device. This is automatically populated depending on the device type selected.
Name
The friendly name for the device.
Driver
The driver which SpaceVC uses to connect to and control the device.
Native Devices
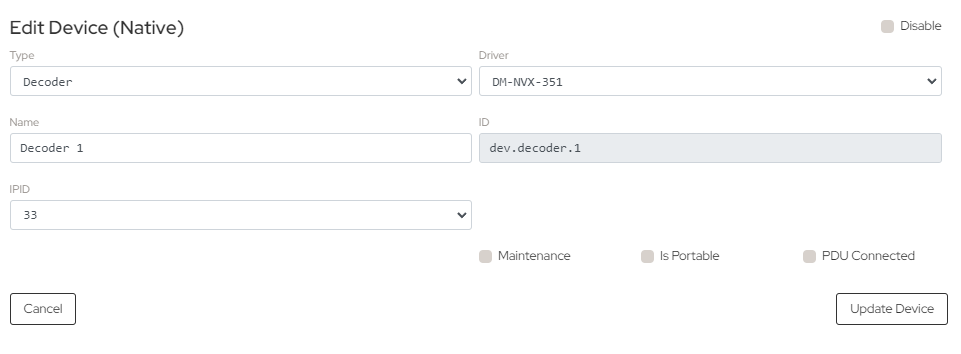
- Type – The device type e.g. Camera or display.
- Driver – The driver which spaceVC uses to connect to and control the device.
- Name – The ‘friendly name’ for the device.
- ID – The auto-generated unique identifier for the device. For e.g. dev.display.1.
- IPID – The Crestron IPID for controlling the device.
IP Devices
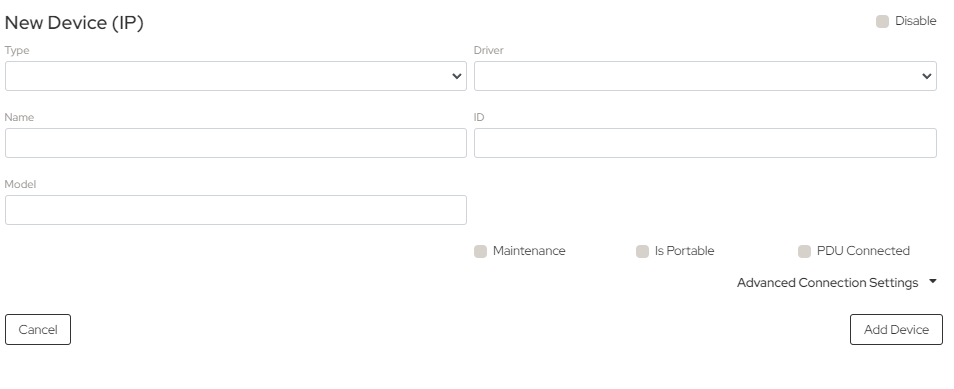
- Type – The device type e.g. Camera or Projector.
- Driver – The driver which SpaceVC uses to connect to and control the device.
- Name – The ‘friendly name’ for the device.
- ID – The auto-generated unique identifier for the device. For e.g. dev.display.1.
- Model – The Model of the device.
Advanced settings –
- IP Port – The IP port for connecting to the device, if different from the device default.
- Baud Rate – The baud rate for controlling the device.
- Username – The username required (if any) to connect to the device.
- Password – The password required (if any) to connect to the device.
ComPort Devices
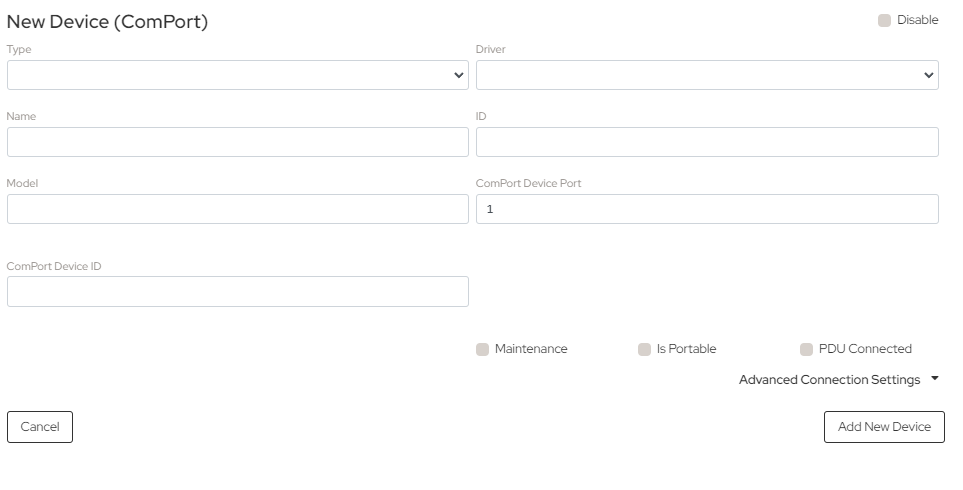
- Type – The device type e.g. Camera or Projector.
- Driver – The driver which spaceVC uses to connect to and control the device.
- Name – The ‘friendly name’ for the device.
- ID – The unique identifier for the device. It is recommended that this be defined in the following format: dev.[device type].[index]. For e.g. dev.display.1.
- Model – The Model of the device.
- ComPort Device Port – Comport Device Port #.
- ComPort Device ID – Device ID for the ComPort.
- Username – The username required (if any) to connect to the device.
- Password – The password required (if any) to connect to the device.
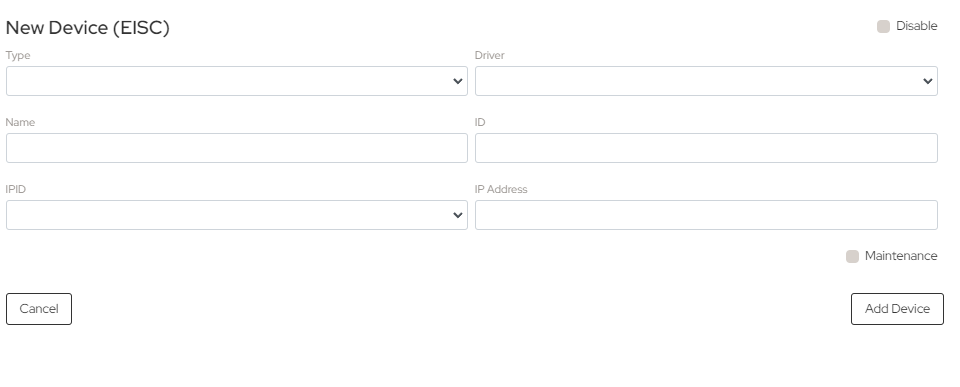
EISC Devices
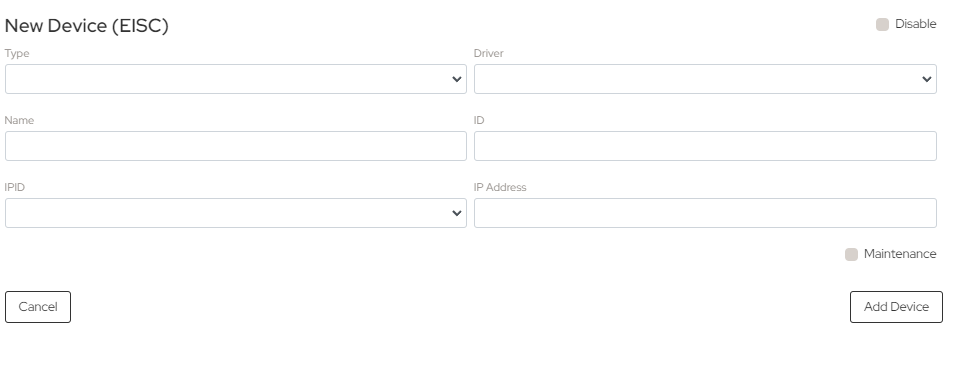
- Type – The device type e.g. EISC Client.
- Driver – The driver which spaceVC uses to connect to and control the device.
- Name – The ‘friendly name’ for the device.
- ID – The auto-generated unique identifier for the device. For e.g. dev.display.1.
- IPID – The Crestron IPID to use for the device.
- IP Address – IP address the device uses to connect.
Gateway Devices
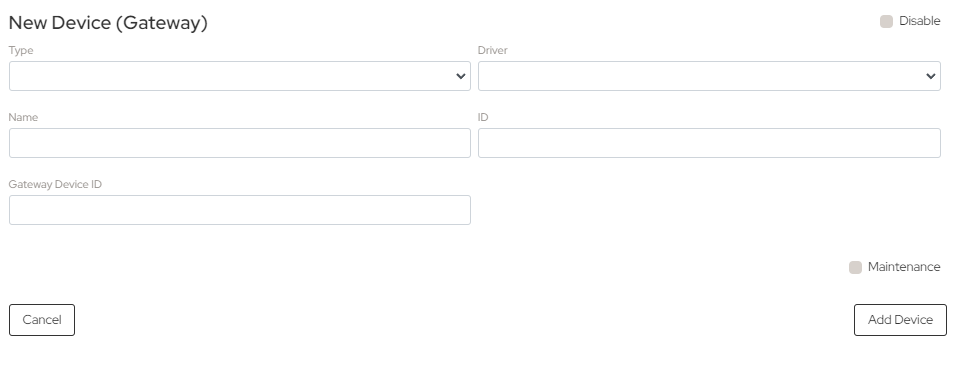
- Type – The device type e.g. Audio Fader.
- Driver – The driver which spaceVC uses to connect to and control the device.
- Name – The ‘friendly name’ for the device.
- ID – The auto-generated unique identifier for the device. For e.g. dev.display.1.
- Gateway Device ID – The ID of the IP device through which this device communicates.
Macros
This array element contains the definitions for any macros. Macros are a series of custom actions shared with Room templates, definable as a lambda script, that are set off by a trigger. Triggers can either be based on an event (e.g. when the system powers on), or on time and day of week.
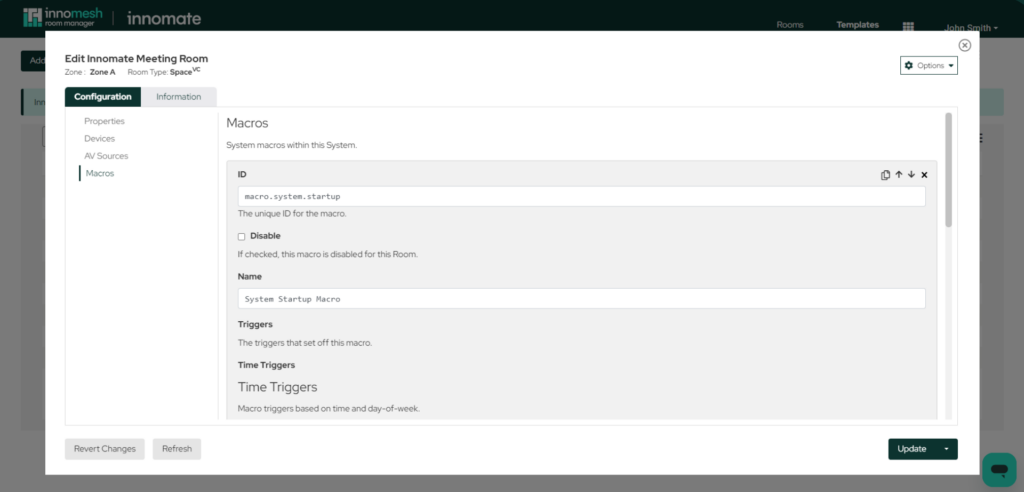
The definition for macros consists of the following elements:
ID
The unique identifier for the device. It is recommended that this be defined in the following format: dev.[device type].[index]. For e.g. dev.display.1.
Disable
If set to true, this device is ignored in the configuration.
Name
The friendly name for the device.
Triggers/ Time Triggers
This array element defines the one or more time-based triggers that set of this macro.
ID
– The unique identifier for this trigger.
Disable
– If set to true, this trigger is ignored in the configuration.
Time
– The 24-hour time, in the format HH:mm:ss, at which the macro is to trigger. Relevant for Time trigger types only.
Days
– A comma separated list of days of the week on which the macro is to trigger. Relevant for Time trigger types only.
Acceptable formats are:
“Monday, Tuesday, Thursday”.
“Weekday” (Monday to Friday)
“Weekend” (Saturday or Sunday)
Triggers / Event Triggers
This array element defines the one or more event-based triggers that set this macro. The array consists of the following elements:
ID
– The unique identifier for this trigger.
Disable
– If set to true, this trigger is ignored in the configuration.
Guid
– The GUID of the object generating the event. Relevant for Event trigger types only.
Property
– The object property this event relates to. Relevant for Event trigger types only.
Key
– For Dictionary object properties, the key by which the property value is accessed. Relevant for Event trigger types only.
Index
– For List object properties, the index by which the property value is accessed. Relevant for Event trigger types only.
Value
– The property value which, if matched, triggers this macro. Relevant for Event trigger types only.
Actions
This array element defines the one or more actions that are set off when the trigger conditions are met. The array consists of the following elements:
ID
– The unique identifier for this action.
Disable
– If set to true, this trigger is ignored in the configuration.
Script
– The lambda script that defines the action.
Device ID
– This is required when the device keyword is used within the lambda script, to specify the ID of the device it is to refer to. Device IDs are defined under #/Devices/IP/ID.
Delay
– The delay, in seconds, between the macro trigger occurring, and the macro action being executed.
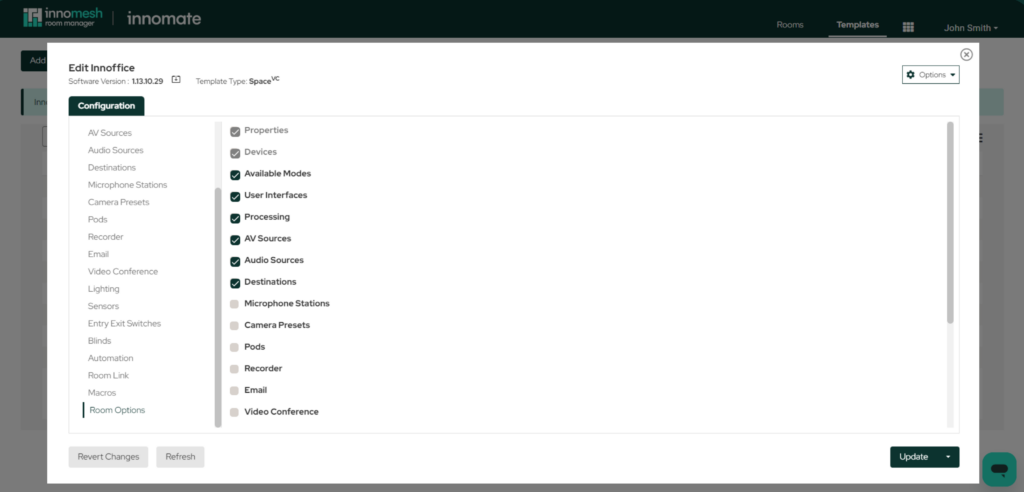
Room Options
“Room Options” is where you define the things from the list that you would like to manage at the room level. You can do that by checking items from the list. When managing the rooms users will only be able to see what you select here.
For more options about user permissions, please see this article here.