Settings
The Settings page lets users manage key platform options by enabling or disabling Change Mode and ServiceNow Incident Automation . Each setting includes a short description to explain its purpose.
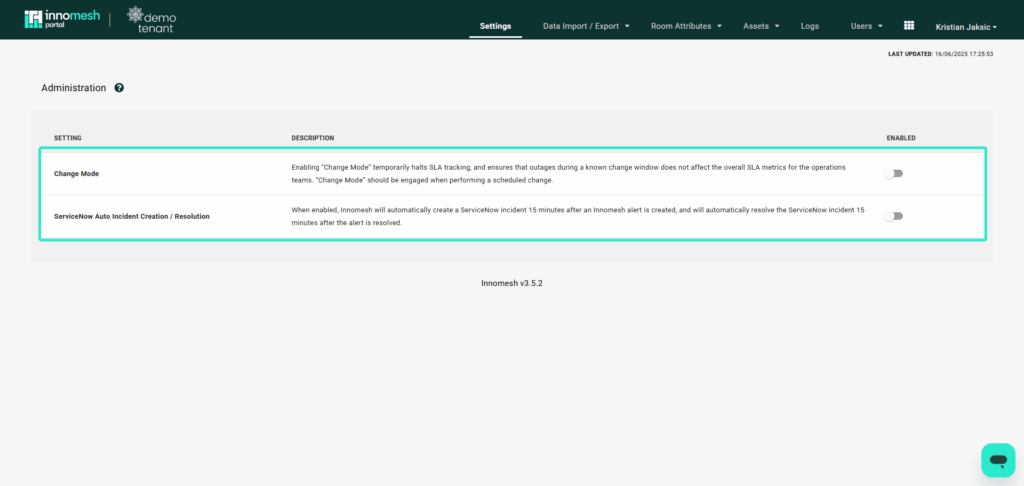
- Change Mode – Enabling “Change Mode” temporarily halts SLA tracking, and ensures that outages during a known change window does not affect the overall SLA metrics for the operations teams. “Change Mode” should be engaged when performing a scheduled change.
- ServiceNow Auto Incident Creation / Resolution – When enabled, Innomesh will automatically create a ServiceNow incident 15 minutes after an Innomesh alert is created, and will automatically resolve the ServiceNow incident 15 minutes after the alert is resolved.
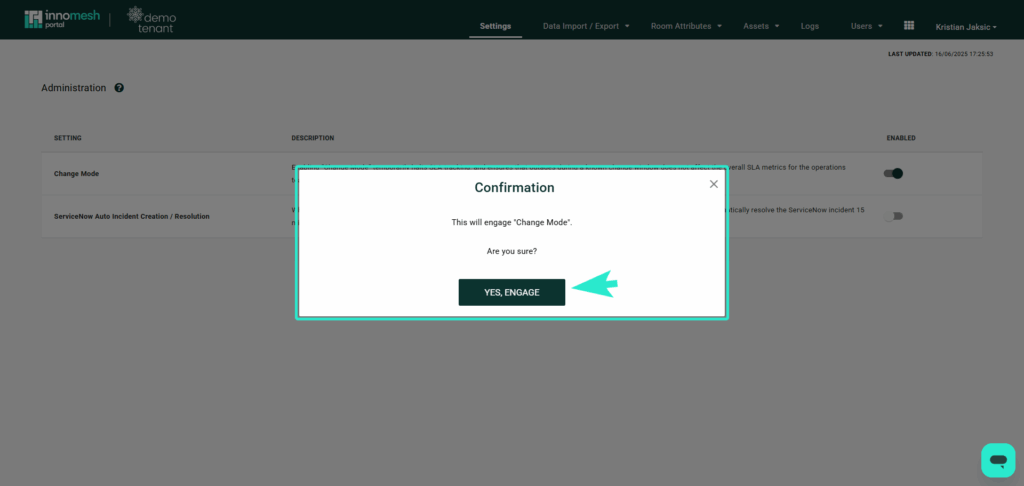
When enabling a setting like Change Mode, a confirmation popup appears to verify the user’s intent. By selecting “YES, ENGAGE”, the user confirms the change and the selected setting will be applied to the Innomesh platform.
Data Import and Export
Note: This highly configurable feature requires our support to enable within your tenancy. If you’re interested in setting this up, please contact a member of the Innomate team to discuss your options.
Dynamic Data Import is an highly configurable feature that enables seamless integration with existing external data sources. With this capability, any room information managed in live external databases can be automatically synchronised with Innomesh. By mapping and importing data directly from external systems, you can ensure that both platforms stay perfectly aligned, eliminating the need for manual data entry into Innomesh and reducing the risk of inconsistencies. As external systems evolve, your Innomesh information will remain up-to-date and accurate.
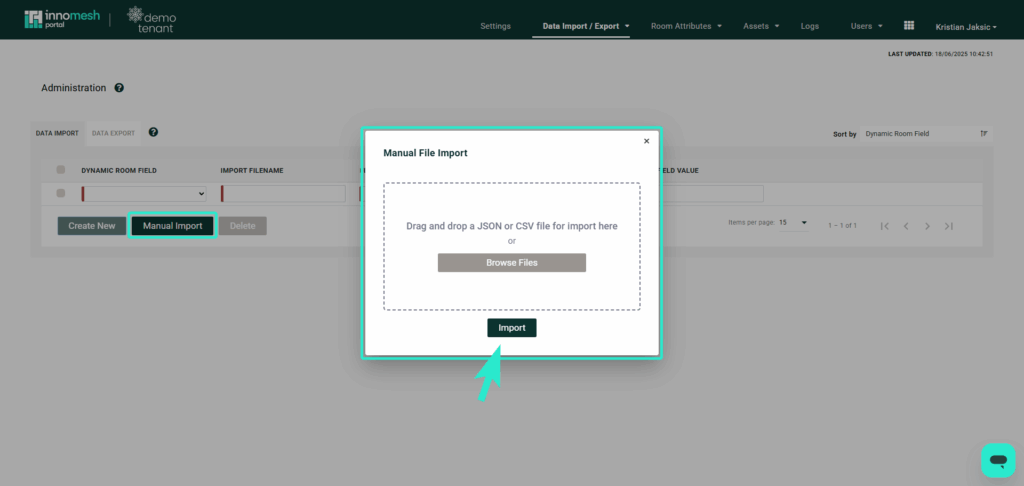
In addition to the ability for data to be dynamically imported on a scheduled basis, There is an option to manually upload a CSV or JSON document to manually import a large amount of data right from your browser. This can be accomplished using the “Manual Import” button on the data import page.
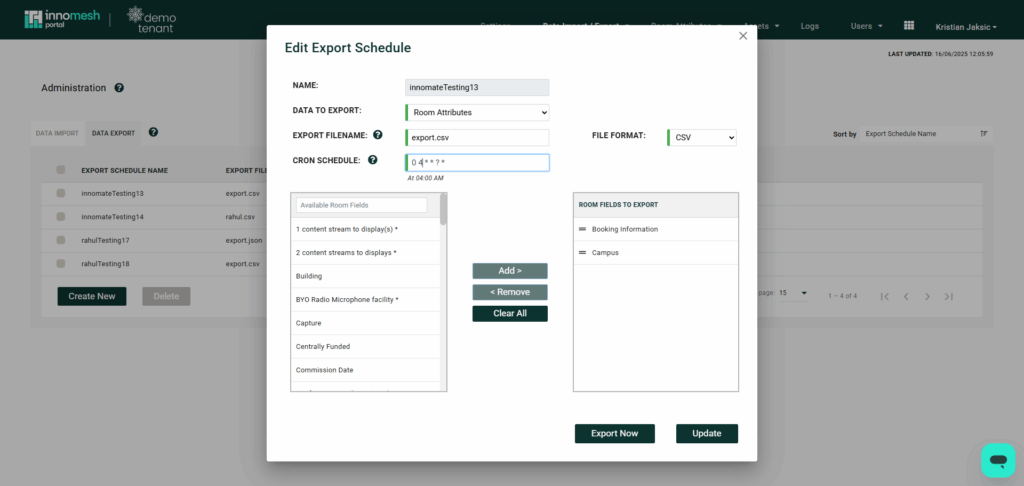
Dynamic Data Export builds on this function, taking data management to the next level by enabling the export of data from Innomesh to external systems. This feature allows you to send any data captured in Innomesh to external sources for advanced processing, analysis, or integration with other workflows.
To manage and configure these processes, visit the Administration Page of the Innomesh Portal under the Data Import/Export section. From there, you can:
- Define file naming schemes for imports and exports.
- Specify file formats and fields to be included.
- Set up a schedule for automated data synchronisation.
Both features utilise a communal data repository to securely hold data during transit.
Dynamic Data Import and Export offer a streamlined, automated solution for managing complex data ecosystems, making Innomesh an even more connected and efficient platform for your room and asset management operations.
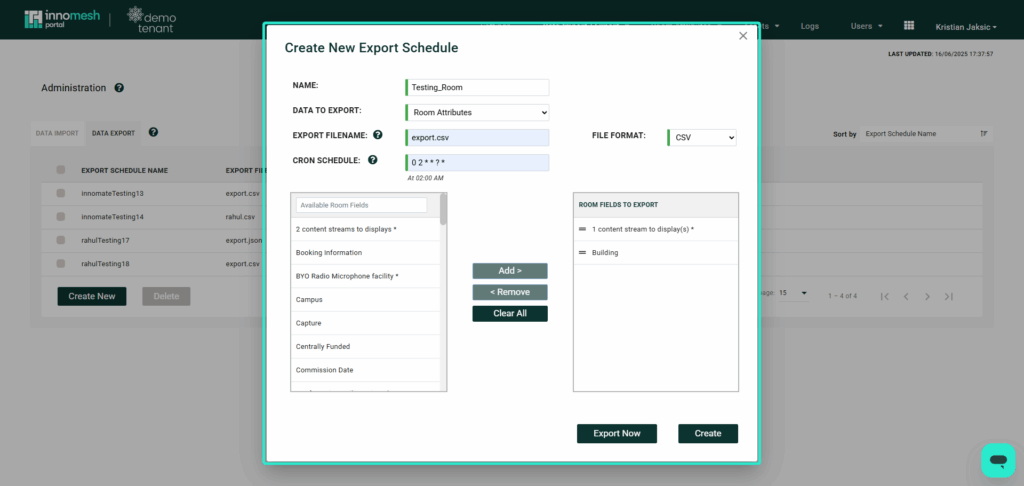
The Create New Export Schedule page lets you set up new automated exports from Innomesh to external systems. Define the data, format, frequency, and destination to ensure seamless, scheduled data sharing.
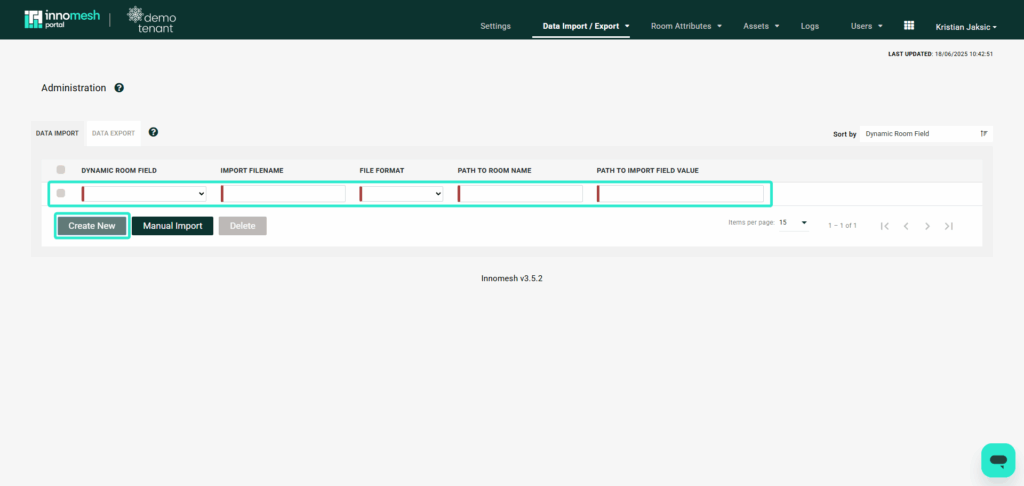
The Data Import page in Innomesh allows you to manage and configure how data is brought into the system. Using the Create New button, you can open a subheading form where fields like Dynamic Room Field (Set up in by Innomate), Import Filename, File Format, and paths for room name and import values can be defined. These fields will then map against the files from a dynamic import or from manual data import.
The Manual Import button opens a drag-and-drop popup that allows you to upload JSON or CSV files directly from your browser. It provides a straightforward and accessible option for clients who prefer a quick manual upload method depending on their use case.
Room Attributes
Smart Room Attributes
The Smart Room Attributes page in Innomesh enables users to view, edit, and create custom room attributes. Instead of manually checking each room to answer questions like how many displays are there or are the microphones active, users can define their own attributes. These smart attributes make it possible to gather and view such queries programmatically by sourcing information directly from room configurations.
Navigating To Smart Room Attributes
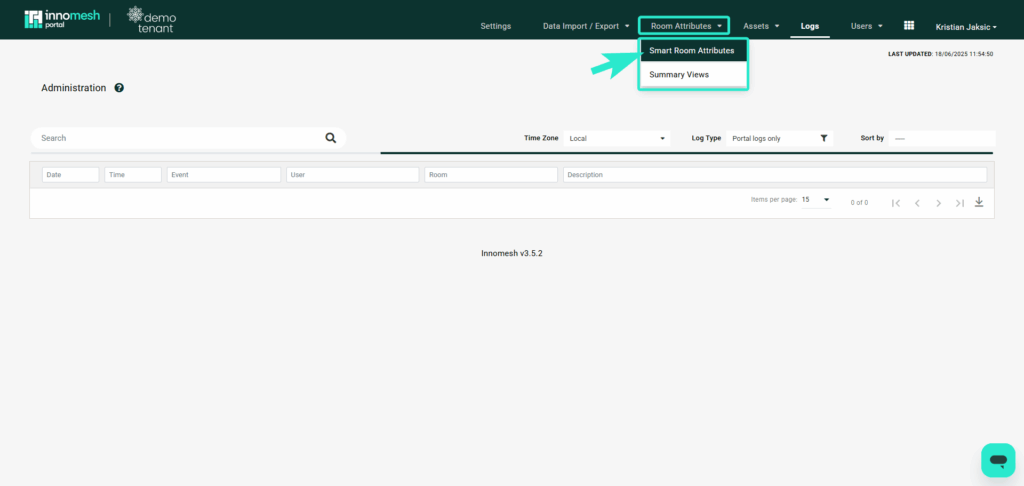
Smart room attributes profiles can be administered and created from the Adminstration page > Room Attributes > smart room attributes. Once this page is opened, a list of asset profiles will be presented.
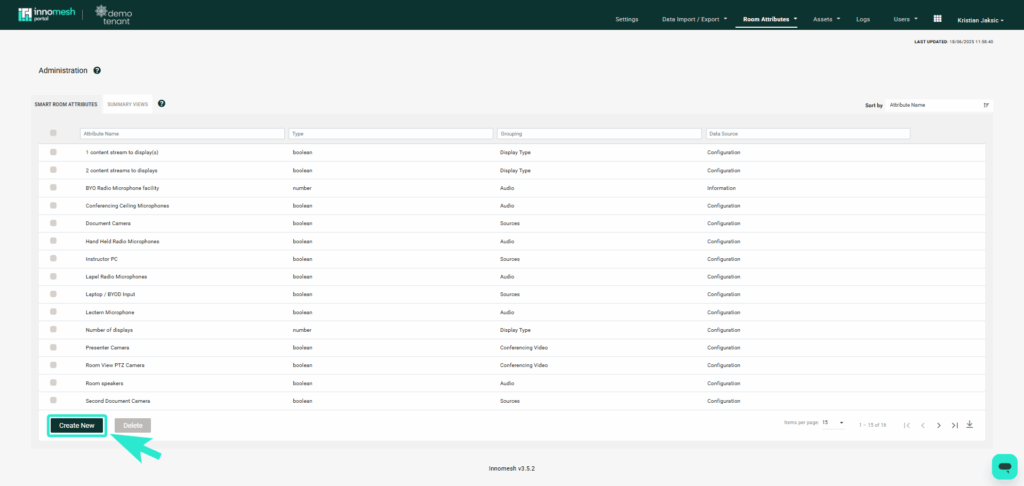
Creating a Smart Room Attributes
To create a new attribute, navigate to the smart room attribute home page and click on the “Create New” button shown below.
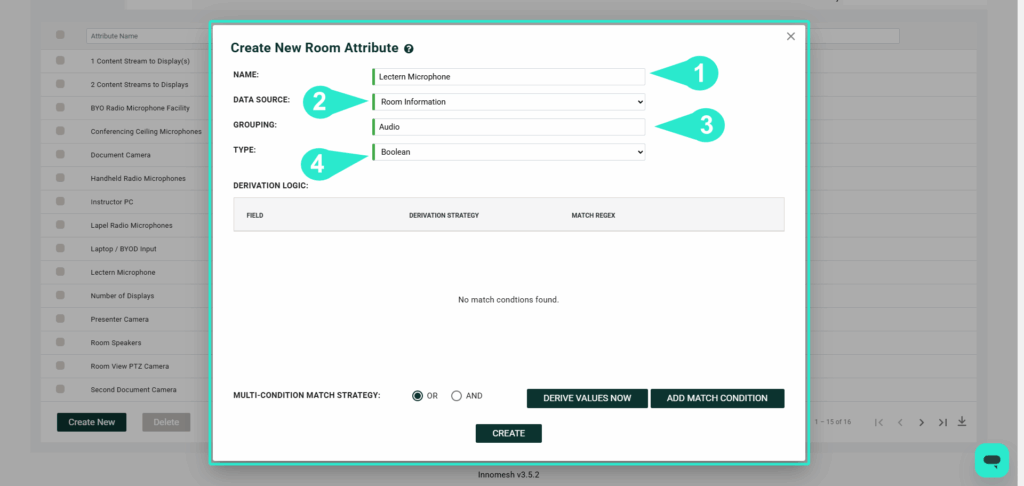
The “Create New Room Attribute” Tab allows users to configure there attribute to ther liking. This allows room attribute to know what its looking for and where to look for it to give users what there searching for.
Name
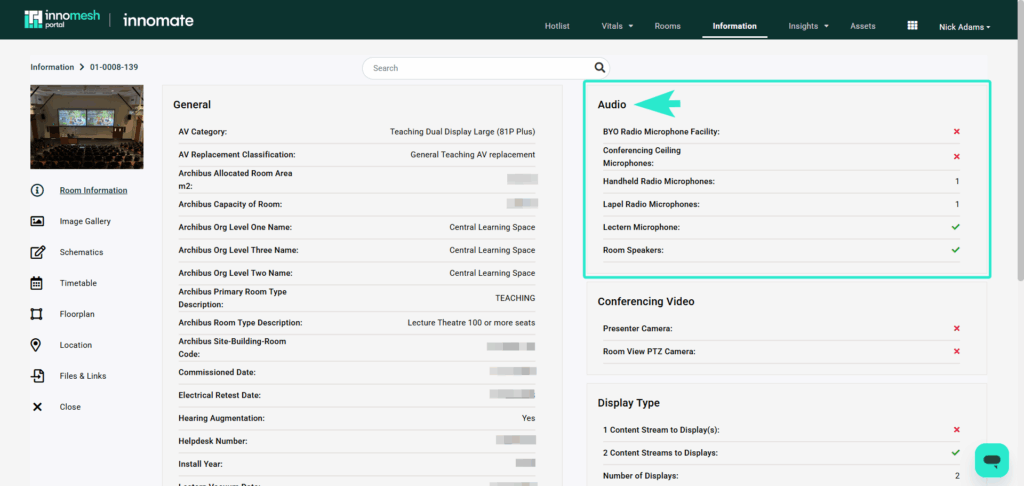
1- NAME: This tab allows users to define room attribute names that label their queries, which will then be displayed in the room’s General tab.

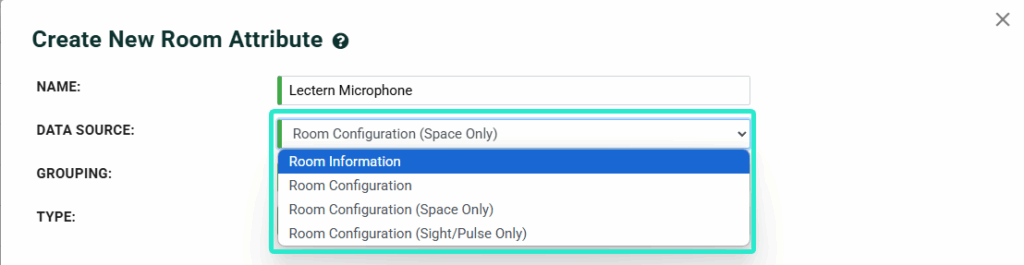
Data Sources
2 – DATA SOURCE: Users can choose the source from which their query information is derived. For example, if they want to retrieve device values only from their Space room, they should select “Room Configuration (Space Only).
Grouping
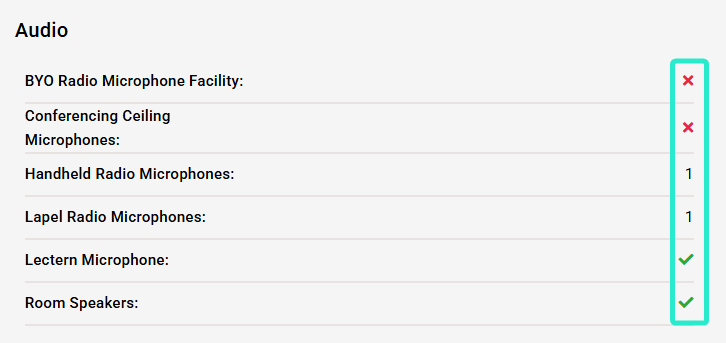
3 – GROUPING: Specifies the subsection where the room attribute will appear within the room’s General tab.
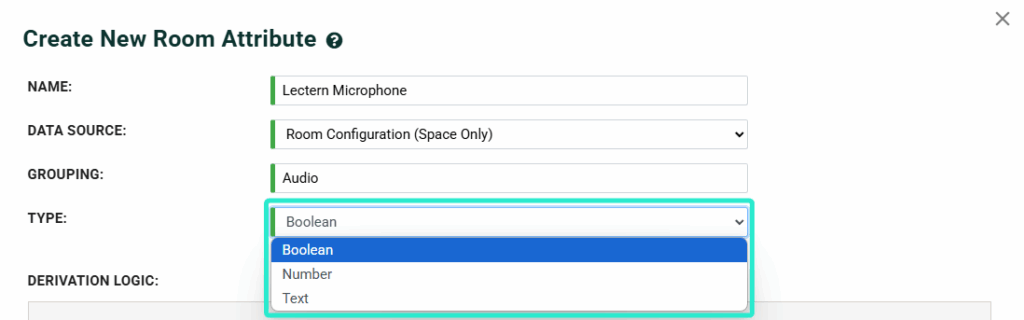
Type
4 – TYPE: Indicates the format or type of result that your query will return. Boolean returns a simple Yes or No, making it useful for queries like “Is the lighting on?”
Number returns a numerical value, helping answer questions such as “How many displays are there?”
Text returns a text-based response, suitable for descriptive or label-based attributes.
Derivation Logic
Derivation Logic defines the pathway that Smart Room Attributes use to navigate through Innomate, allowing them to locate, extract, and return information from relevant sources for room attributes.
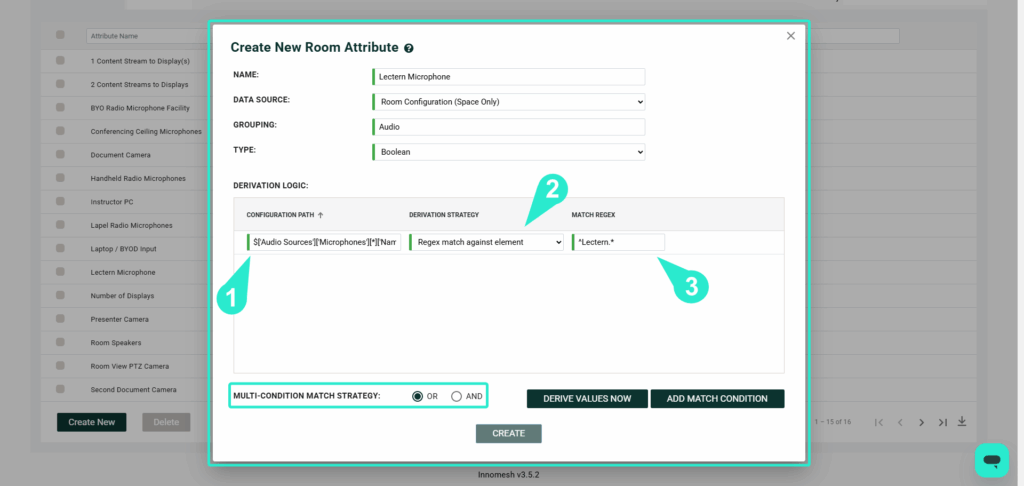
Configuration Path
1 – Configuration Path: Users can specify which configuration path to follow in order to locate the relevant information and automate the search process.
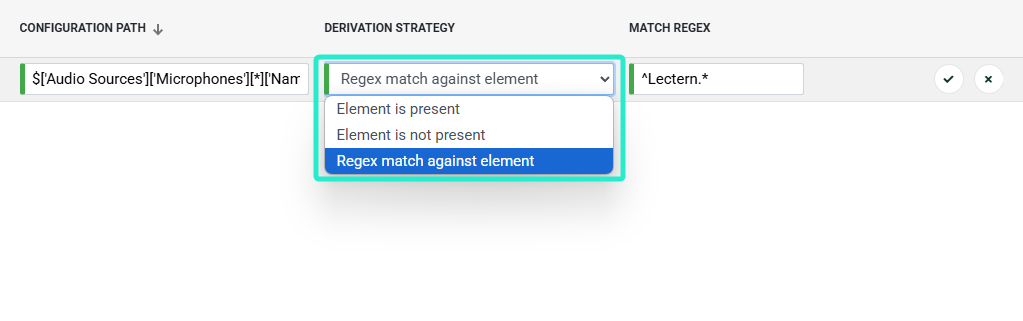
Derivation Strategy
2 – Derivation Strategy: Defines the strategy the program will follow to retrieve and display the output, which may vary depending on the selected approach.
Match Regex
3 – Match Regex: This tab allows users to define search specificity. For example, using(^Lectern.*) enables the system to specifically search for and match items beginning with “Lectern.”
Multi-Condition Match Strategy
MULTI-CONDITION MATCH STRATEGY: Allows multiple Match Conditions to be applied. “OR” means the room attribute will match if any condition is met, while “AND” lets all conditions to be satisfied for the attribute to be applied.
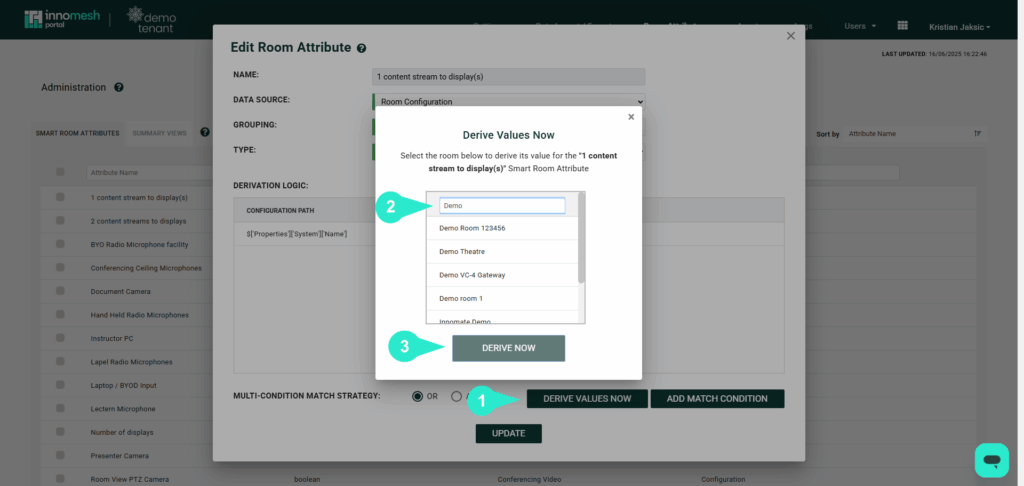
Derive Values Now allows users to instantly test their room attribute to check for errors and confirm whether it is working successfully.
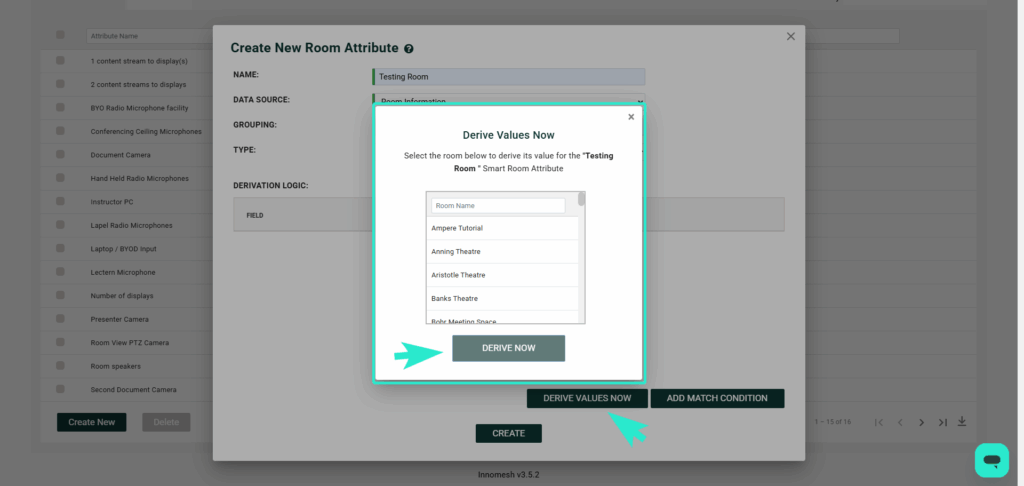
Selecting “Derive Values Now” opens a new popup where users can choose specific attributes to derive. Simply select the desired attribute(s), then click the “Derive Now” button at the bottom to proceed.
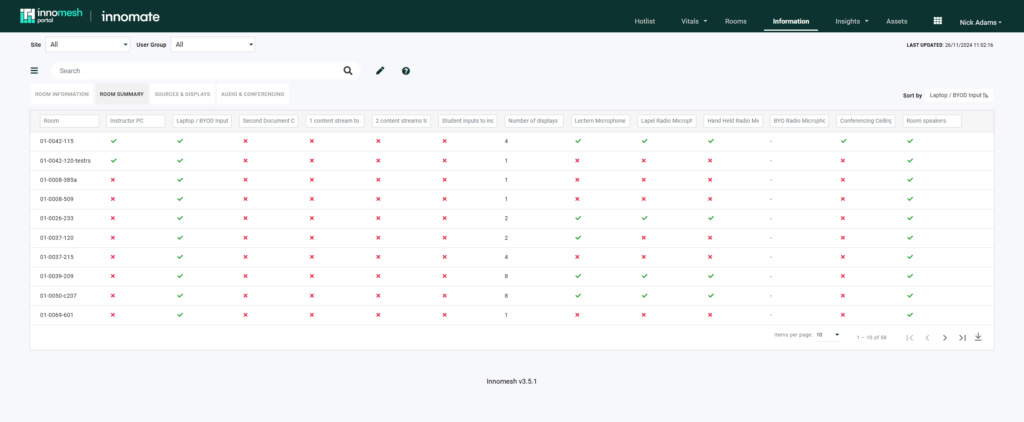
Room Summary Views
Released as part of Innomesh V3.5.1The Smart Room Attributes, along with existing room information, can then be sorted into views using the “Summary Views” tab in the administration page, making it easy to compare, sort and evaluate rooms from the Information page. The individual summary views can be seen at the top of the Room Information table as tabs
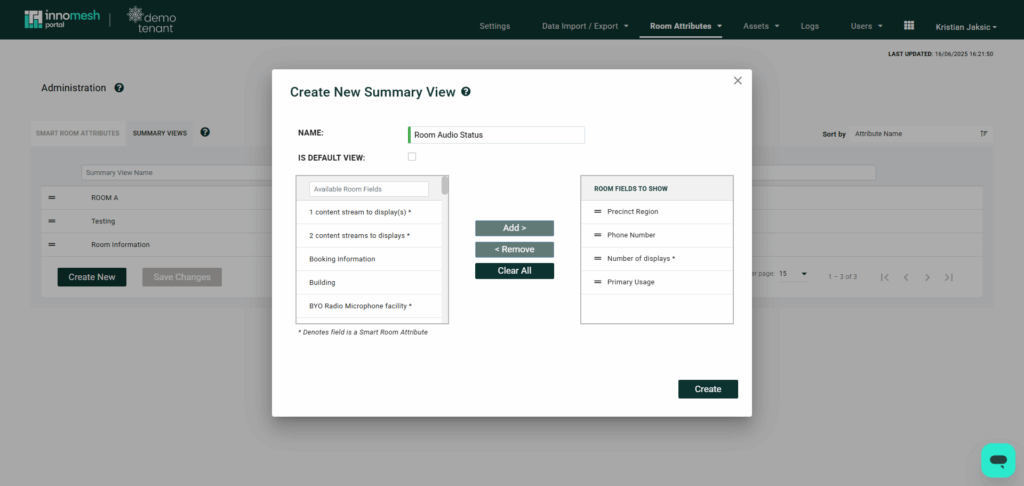
To create a summary view, go to Administration>Smart Room Attributes>Summary Views. Click on Create New, Give it a name and select the fields you would like to see on the Information page.
Assets
Overview
‘Asset Profiles‘ deliver a broad range of new sub-features and functionality, and has been developed to streamline the process of onboarding and maintaining devices. At a high level, Asset Profiles enforces consistency for device information entered into the Innomesh environment and ensures that asset data is normalised in the platform. Asset profiles are also used to serve the “Specifications” page on the “Asset Information View.”
Every device created in Innomesh portal must have an asset profile and a driver mapped to the aforementioned asset profile before it will be selectable in Room Manager.
It is in your best interest to include as much detail as possible when creating an asset profile as this data may end up being very valuable/helpful in troubleshooting and/or data gathering in the future.
Navigating to Asset Profiles
Asset profiles can be administered and created from the Adminstration page > Assets > Asset Profiles. Once this page is opened, a list of asset profiles will be presented.

Creating an Asset Profile
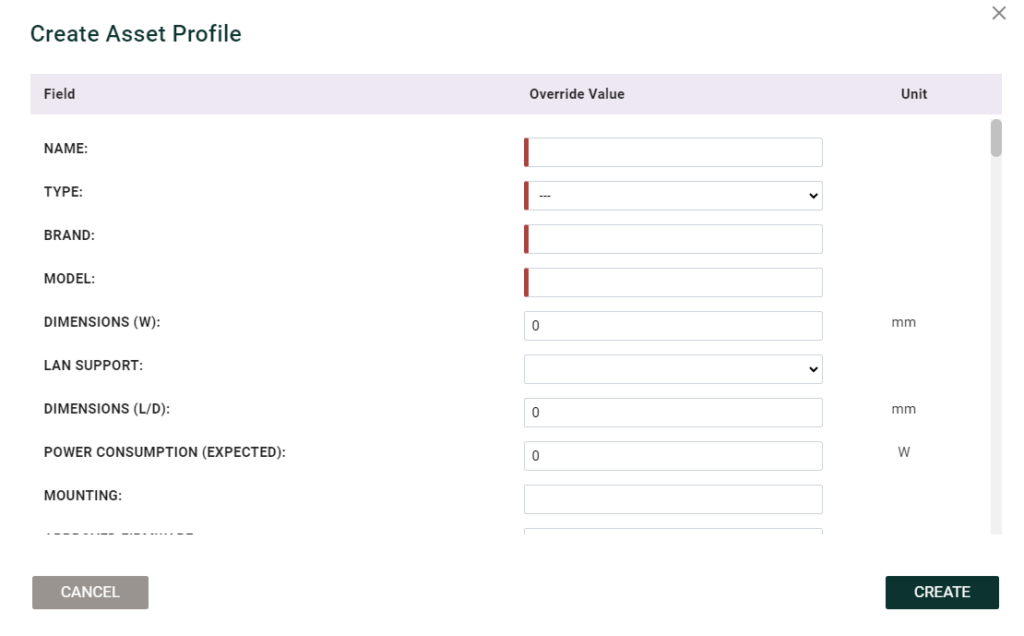
Click on “Create New” at the bottom of the Asset Profile list to open the “Create Asset Profile” form. On this form, the asset Name, Type, Brand and Model are required fields, while the remaining fields are optional.
Driver Mapping
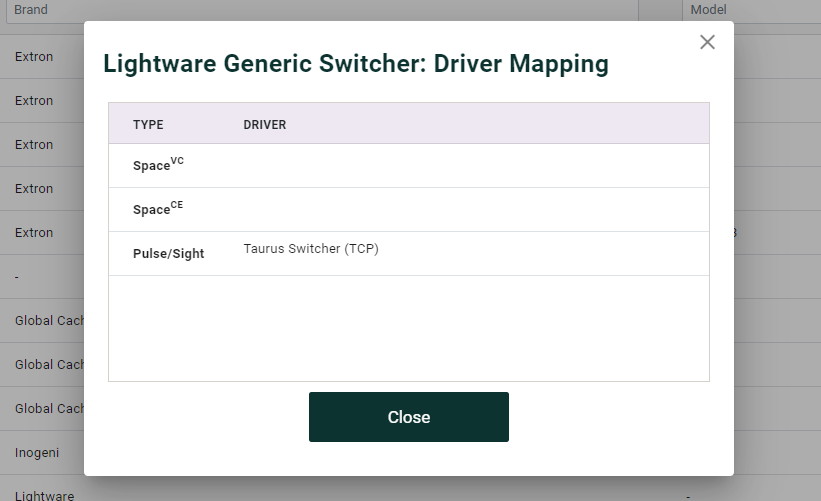
For a device to be available during room creation, a driver must be mapped to its asset profile. The driver types associated with the asset profile (Space CE, VC, Sight and Pulse) will determine whether the asset profile will be available on the device list when adding or editing a device. For example, A device with a Space VC driver but not a Space CE driver will not appear in the device list when creating a Space CE room.
Updating Profile Picture
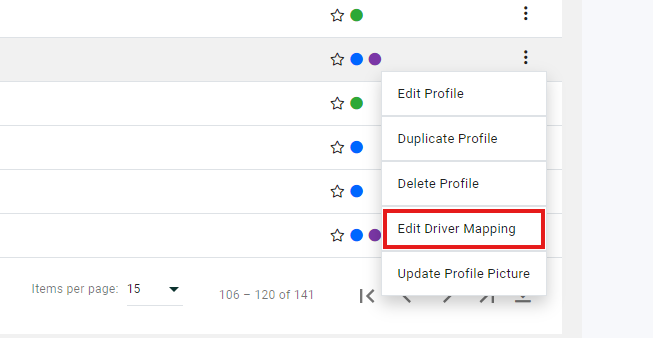
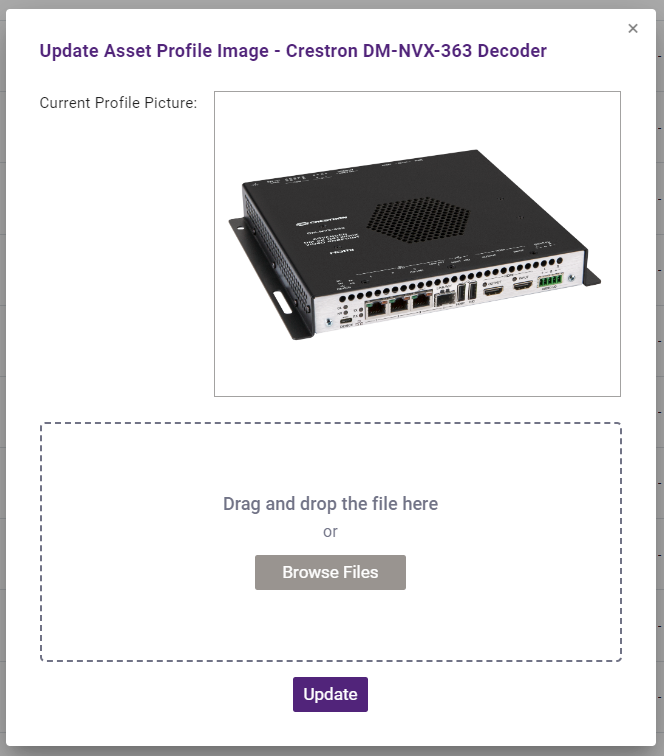
In the Asset Information View, there is a profile picture for each asset to give users an idea of what it looks like physically. To add these photos, select Update Profile Picture from the context menu and drag and drop or browse your computer for the file to upload.
Updating Profile Picture
In the Asset Information View, there is a profile picture for each asset to give users an idea of what it looks like physically. To add these photos, select Update Profile Picture from the context menu and drag and drop or browse your computer for the file to upload.
Using Asset Profiles
When adding devices to a room in Innomesh, users will be presented with a list of available devices based on the configured asset profiles and driver types. This ensures that users enter accurate information when creating or editing devices in rooms, eliminating the need to manually input device details each time.
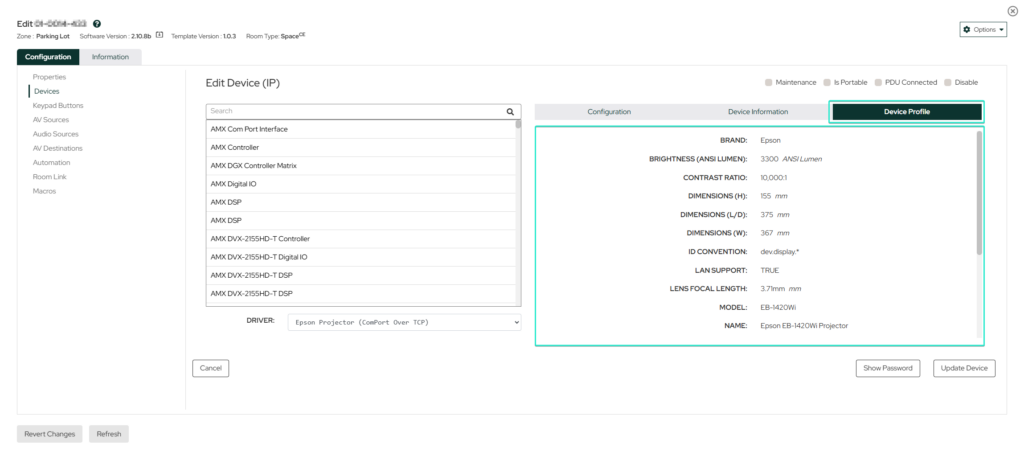
The information input to the asset profile will be presented to you when adding devices to a Room in Room Manager. When selecting “Device Profile” from the navigation bar in Device Configuration, you will be able to view the information about the Asset that is currently selected.
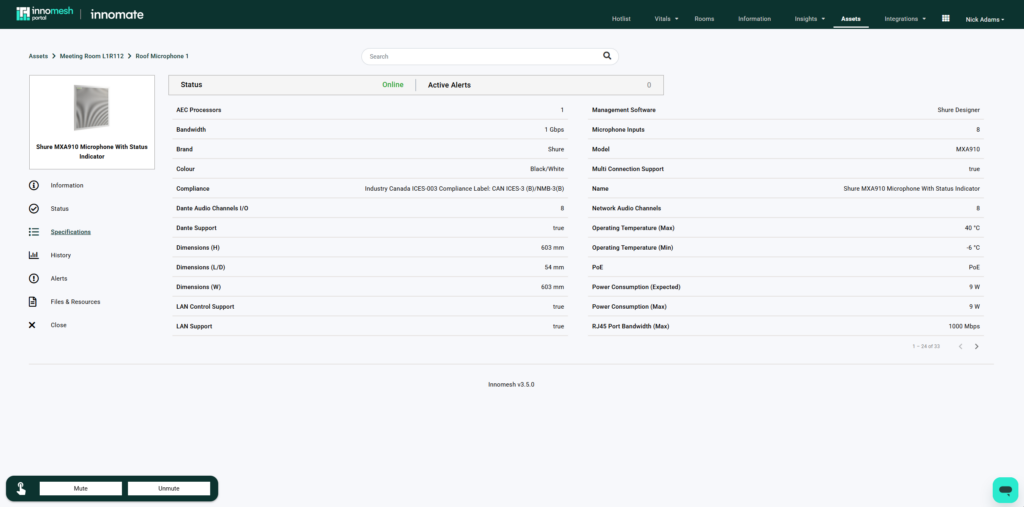
After creating the room, the asset will automatically appear in the Assets Registry within the Innomesh Portal. From there, clicking on the asset will open the Asset Information View, which provides a comprehensive overview of the asset’s details, including specifications, status, and any associated documents or media. For existing devices, asset profiles will be matched as follows: Manufacturer > Type > Model. So if a model asset profile does not match it will fallback to a Manufacturer and Type match.
Actions Manageability (Ops)
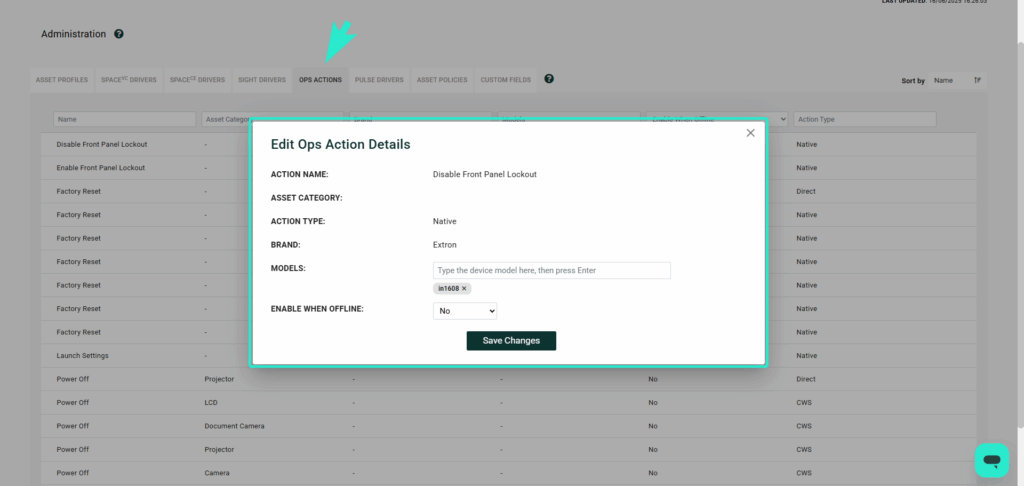
Released as part of Innomesh version 3.4.1, Innomesh Portal Administrators now have the capability to upload files and manage actions for Ops directly through Innomesh.
Features
This allows Administrators to:
- Add devices to existing Ops actions
- View and modify the functionalities of specific Ops actions
- Update the files that will be deployed to devices for actions requiring this function, such as updating the touch panel file pushed via the Ops action
Logs
Innomesh Room Manager and Portal Audit Logs feature is now generally available.
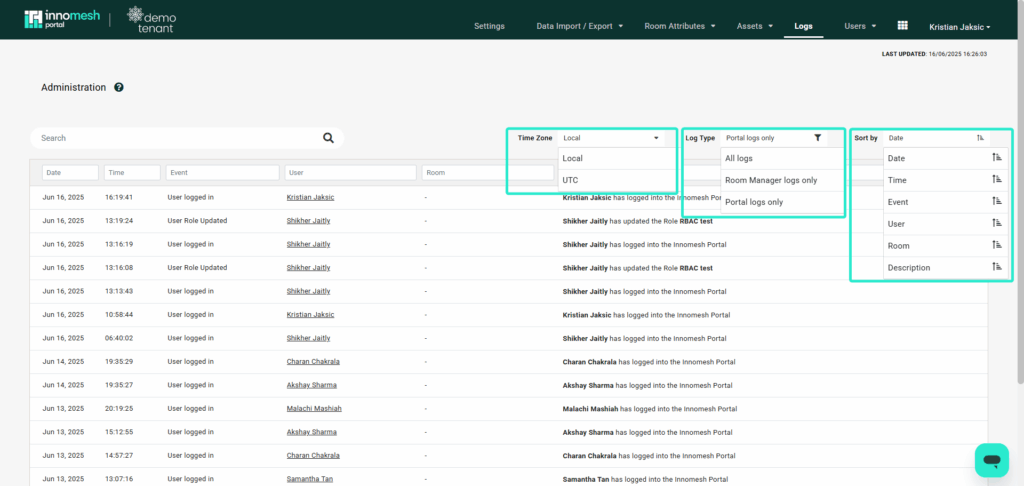
The Logs page provides a detailed activity history of actions performed within the Innomesh platform. It allows you to monitor user activity, such as logins, profile edits, asset interactions, and edits to rooms. With sortable columns and filters, this page helps administrators keep tabs on what changes are being made, when, and by whom.
Users
Innomesh User Page and RBAC Authorisation Guide
This article aims to guide all environment holders in setting up new users and managing their permissions within the Portal and Room Manager environment. It specifically addresses the implementation of the Role-Based Access Control (RBAC) feature introduced in Innomesh version 3.3.0.
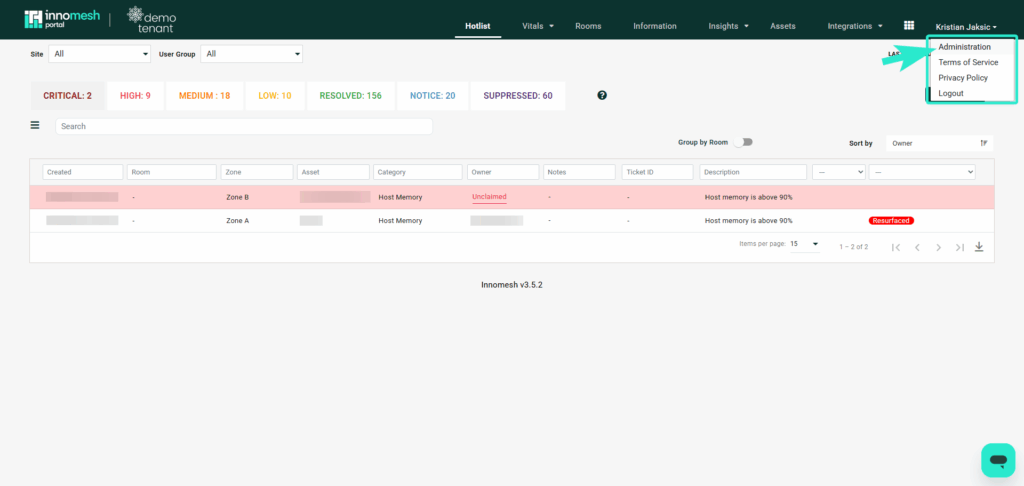
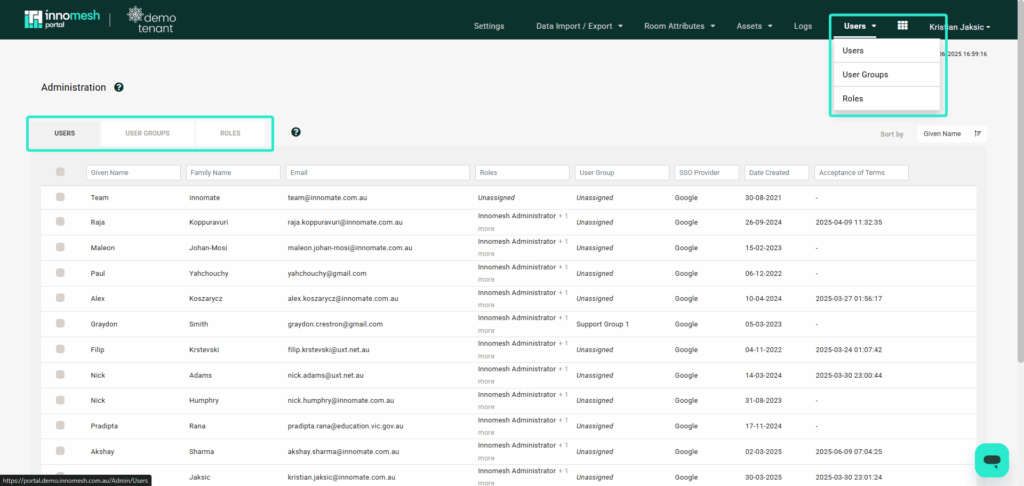
To access RBAC, navigate to the Innomesh Portal and select the “Administration” option from the dropdown menu by hovering over your name in the top right corner of the page.

Once on the Administration page, you will need to click on “Users” from the dropdown menu under “Users” to access the RBAC options, as shown below:
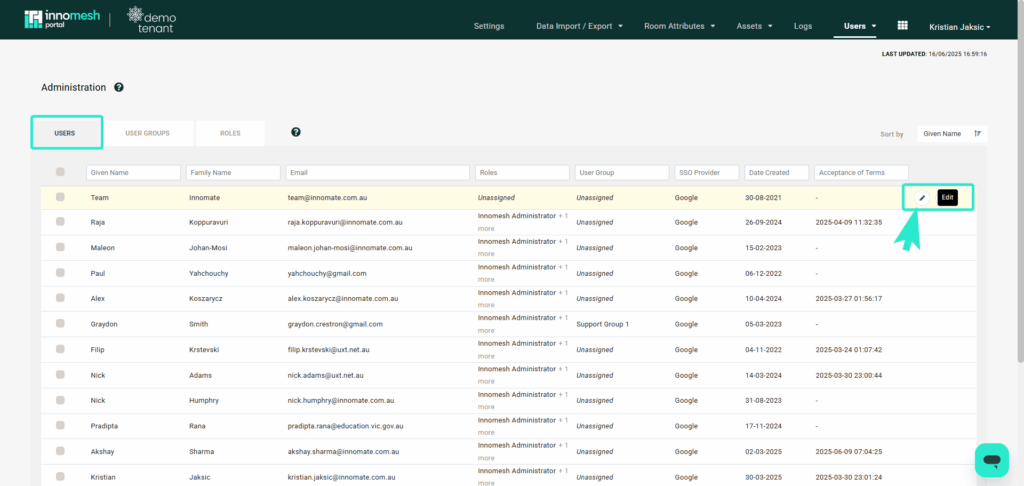
In the Users section, administrators have the ability to view and edit specific user roles or assign groups to users. This allows administrators to restrict a user’s access based on the predefined configurations of the assigned group.
When hovering over the right side of a user, the options for editing and deleting become visible.
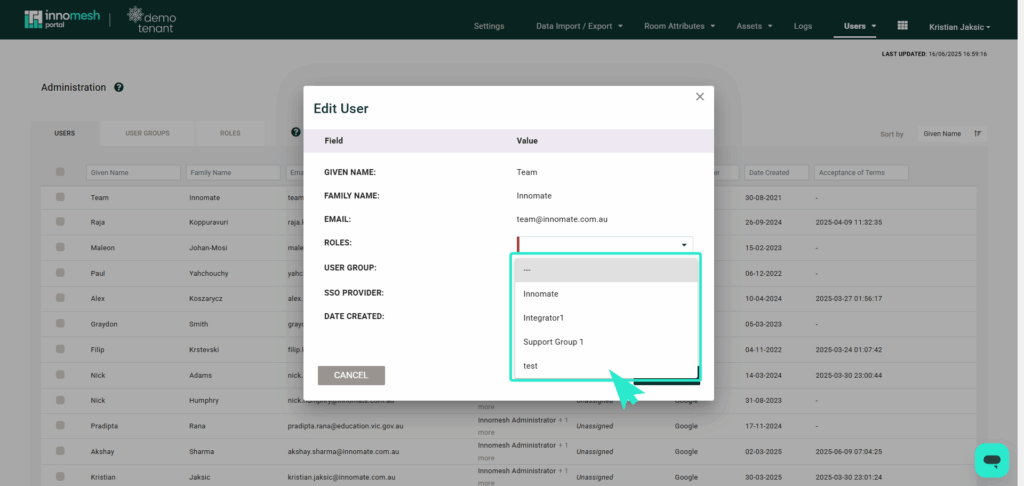
When attempting to edit a user, you can view the following information in this section: the user’s details, including their Single Sign-On (SSO) provider and the date they initially requested an account as shown below:
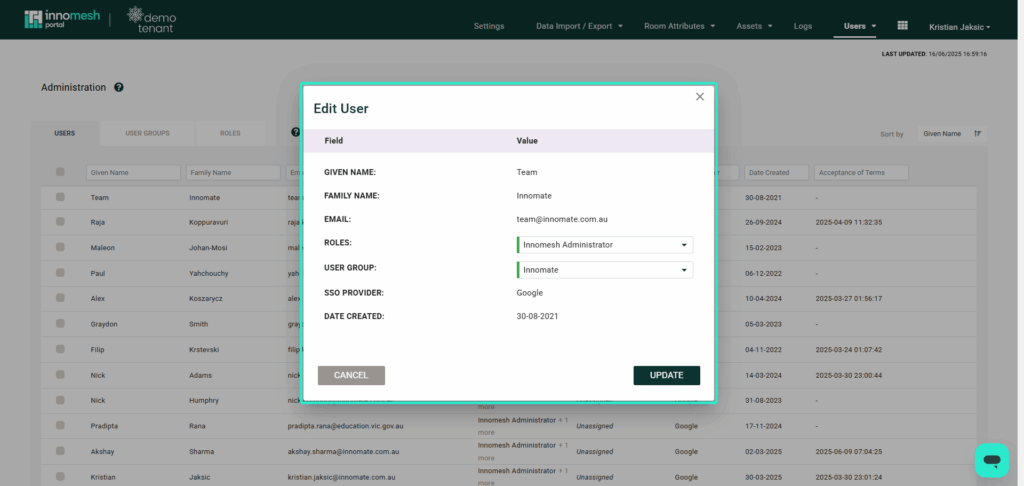
User requests an account by attempting to log in with their SSO or SAML account which shows you their details in the Users list without any prior permissions.
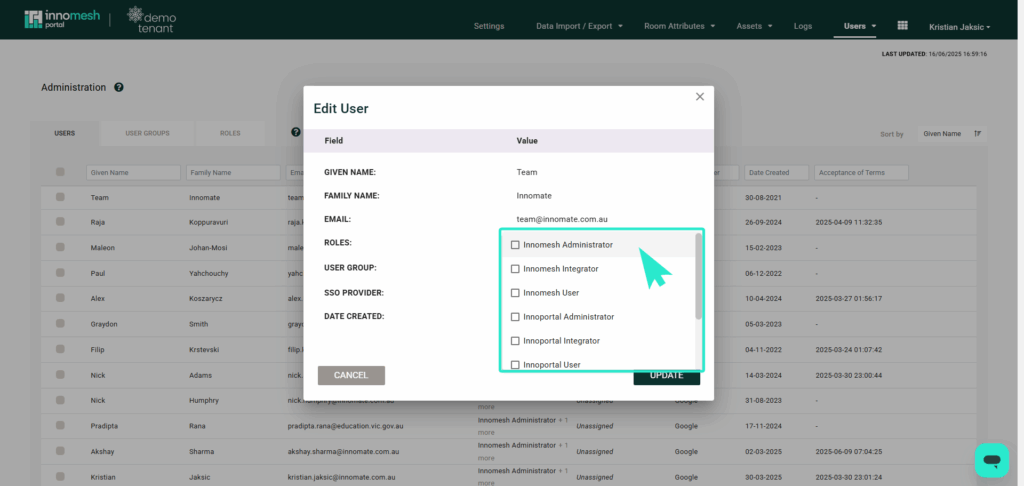
Roles In Edit Users
You can edit a user’s roles by selecting from the pre-configured roles provided by your administrator.
Assigning roles to a user overrides the configured permissions of the assigned groups.
User Group
The user group dropdown option enables you to choose a specific configured group.
User Groups
User Groups are groupings by which users can be categorised. User Groups can represent organisations, departments, and specialisations. Within the user group, you have the ability to create or delete a specific group.
Please note that the User Group section is not the location to set permissions and access within your environment. The “Roles” tab is responsible for permissions and access control.

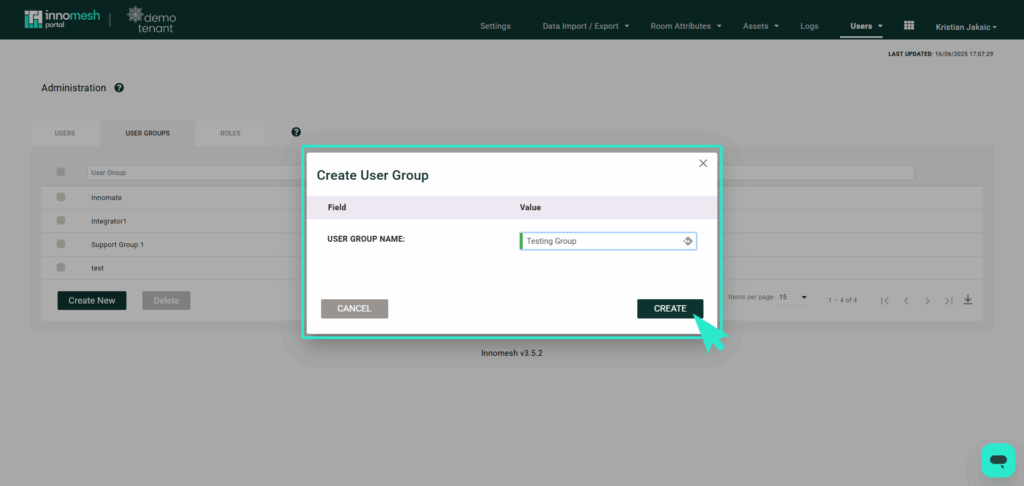
Creating a Group
You can start the group making process by clicking “Create New” as shown in previous photo which would lead you to a window as shown below:
Roles
Roles define how much access a user has into the Innomesh Room Manager and Portal. Each Role defines a fine list of access permissions into various sections of Room Manager and Portal, as well as which campus and which User Groups’ rooms the user is allowed to access. Roles are enforced on the user when they next log in.
In this section, you can create, edit, and delete your desired roles. This is the core aspect of RBAC, empowering you to configure all permissions, including those associated with specific groups.
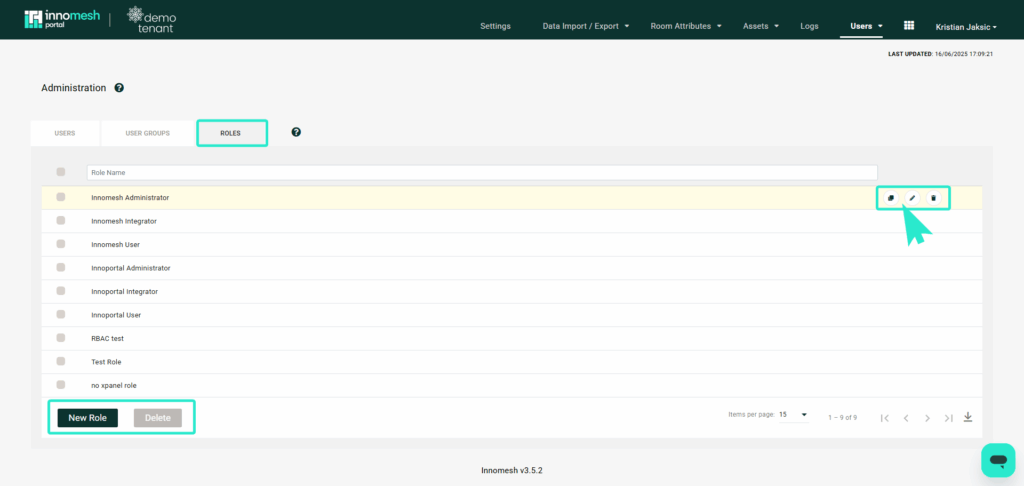
Creating a Role
Please avoid deleting default Innomesh roles, as these are essential for Innomate/UXT support in your environment. Modifying their permissions may impact associated staff.
To create a new role, click the “New Role” button, as shown in the previous image. This action will open a window, presenting the necessary options for configuring a role:
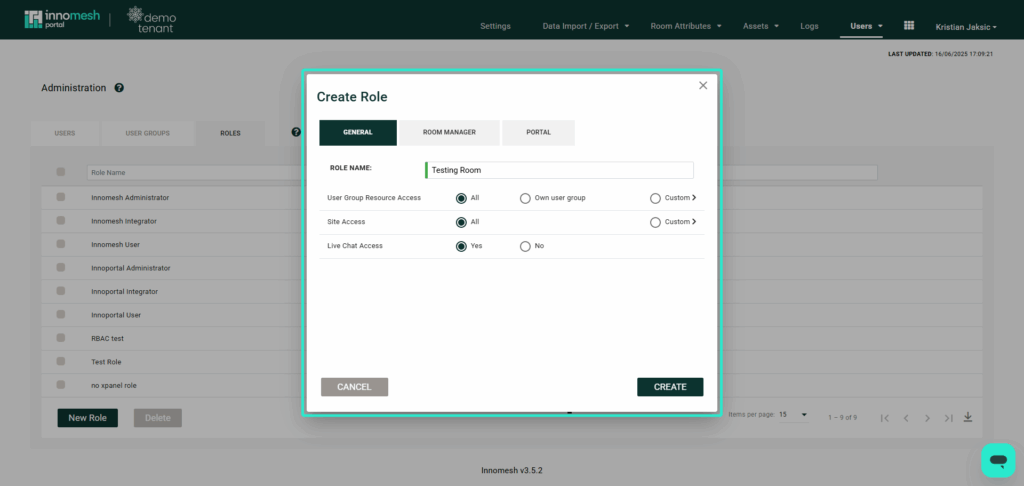
General
Within the General tab, you can manage and set up the role’s general access to the platform. Below are descriptions of each option:
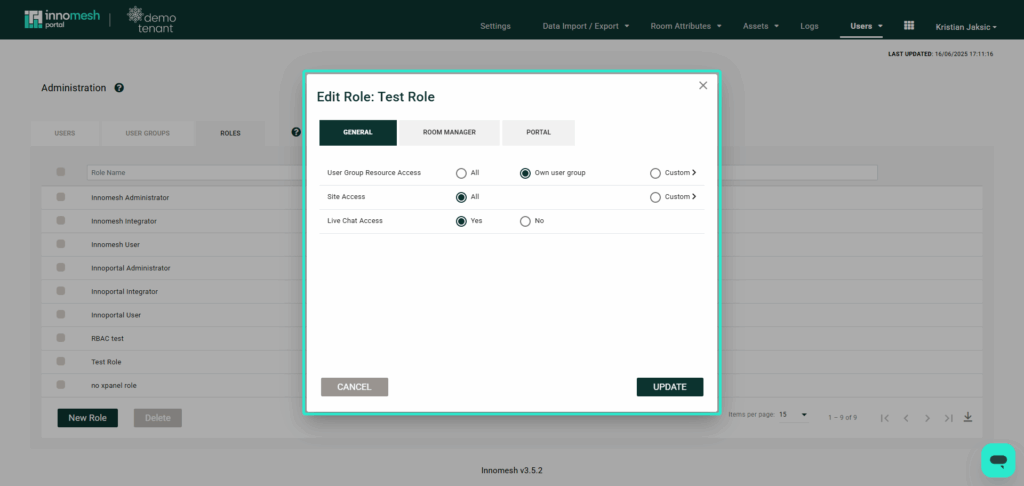
User Group Resource Access
This determines which User Group’s rooms this role can access.
- The “All” option grants users with this role access to edit every group’s rooms.
- With the “Own User Group” option, users can only access and edit rooms within their own user group, as demonstrated below. (eg. Testing Group for user John Smith)
- The “Custom” option allows you to select specific user groups that you would like this role to access as shown below:
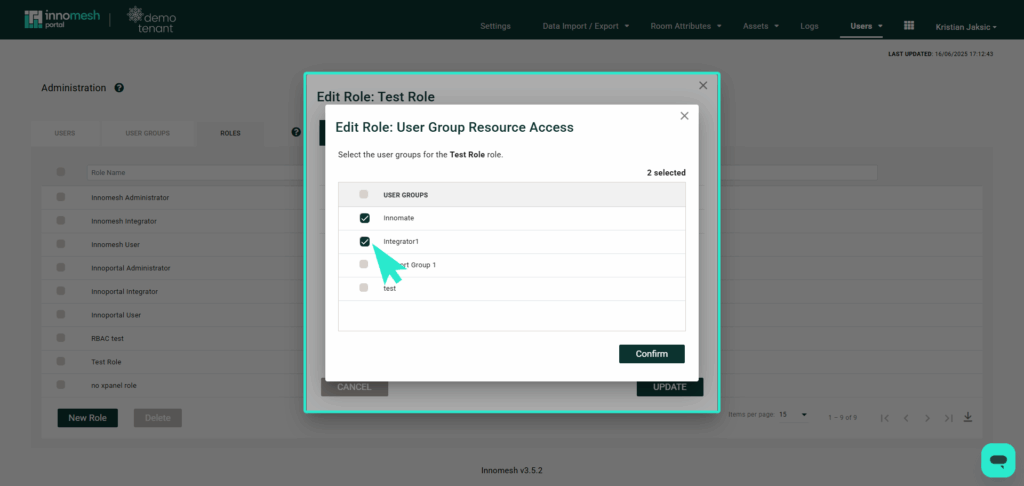
Please note that User group does not define the role/access permissions to the platform, rather it defines the rooms that specific users will have access to.
Site Access
Site Access determines which site this role can access. It can be set to “All” if the corresponding option is selected, or it can return an array of sites if “Custom” is chosen.
Please note that “Vitals” and “Insights” dashboards do not support site filtering at this time.
Please note that sites may not be specifically configured for your environment. If you wish to request or inquire about setting up site filters for your environment, you can contact our support team here.
Live Chat Access
Choose “Yes” or “No” based on your preferences for users with this role to access via live chat.
Room Manager
This tab allows you to configure and restrict this role to determine what users can view and edit within the Innomesh Room Manager.
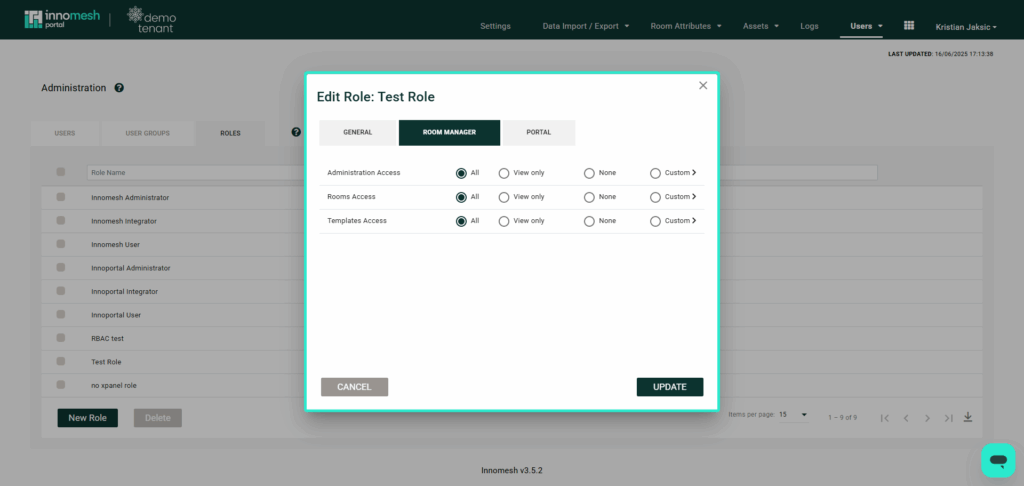
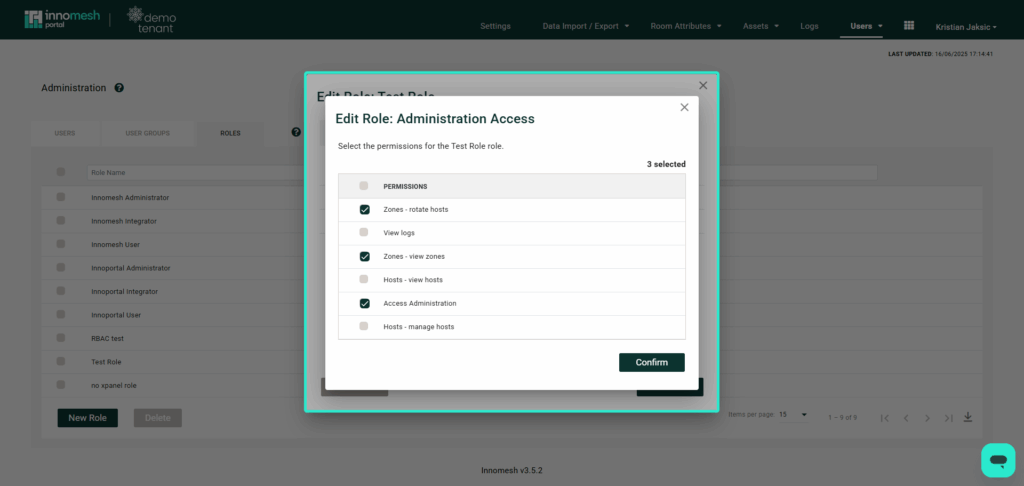
Administration Access
This field enables you to customise what this role can do within Innomesh’s administration section.
- The “All” option allows the user to view and access all of the following:
- Zones (rotate hosts, view logs)
- Zones (view zones)
- Hosts (view hosts)
- Access Administration
- Hosts (manage hosts)
- The “View only” option permits users to only view all of the above.
- The “None” option restricts users from accessing administration sections.
- The “Customise” option enables you to select the fields you would like the user to view and access as demonstrated below:
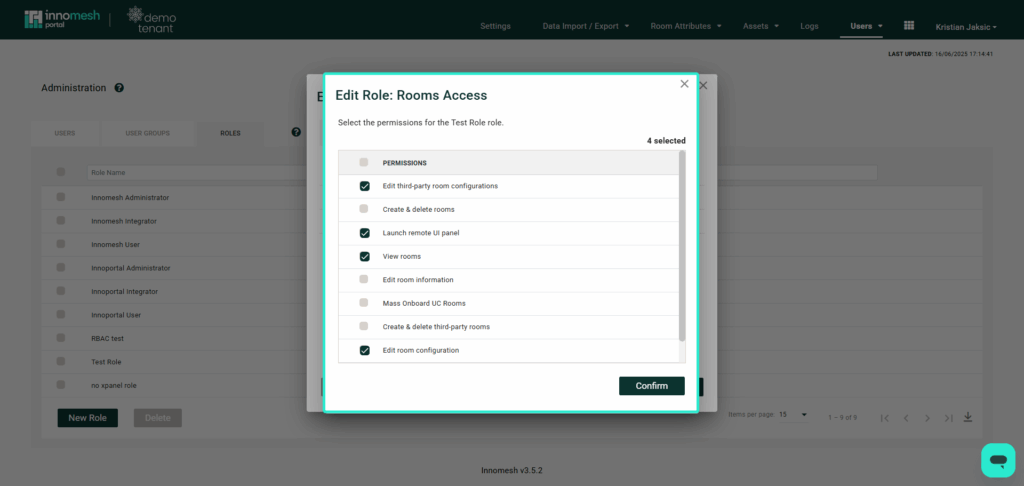
Rooms Access
This field allows you to configure the permissions for this role within the Room Manager’s “Rooms” tab.
- The “All” option allows the user to view and access all of the following:
- Edit third-party room configurations
- Create and delete rooms
- Launch remote UI panel
- View rooms
- Edit room information
- Create and delete third-party rooms
- Edit room configuration
- Expose all room options
- The “View only” option permits users to only view all of the above.
- The “None” option restricts users from accessing the rooms tab.
- The “Customise” option allows you to choose the specific fields that the user can view and access within the Rooms tab, as illustrated below:
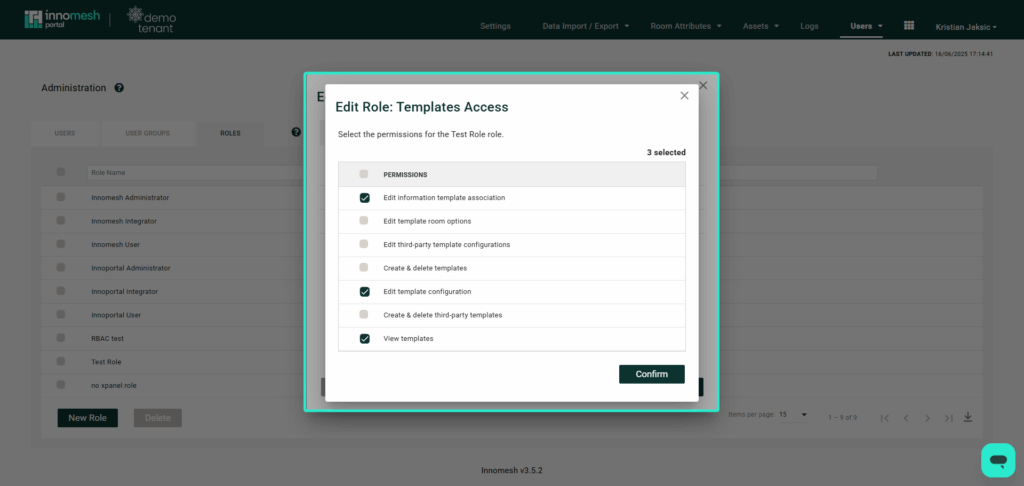
Templates Access
This field allows you to configure the permissions for this role within the Room Manager’s “Templates” tab.
- The “All” option allows the user to view and access all of the following:
- Edit information template association
- Edit template room options
- Edit third-party template configurations
- Create and delete templates
- Edit template configuration
- Create and delete third-party templates
- View templates
- The “View only” option permits users to only view all of the above.
- The “None” option restricts users from accessing the templates tab.
- The “Customise” option allows you to choose the specific fields that the user can view and access within the templates tab, as illustrated below:
Portal
This tab enables you to define and limit the role’s scope in terms of what users can view and accomplish within the Innomesh Portal
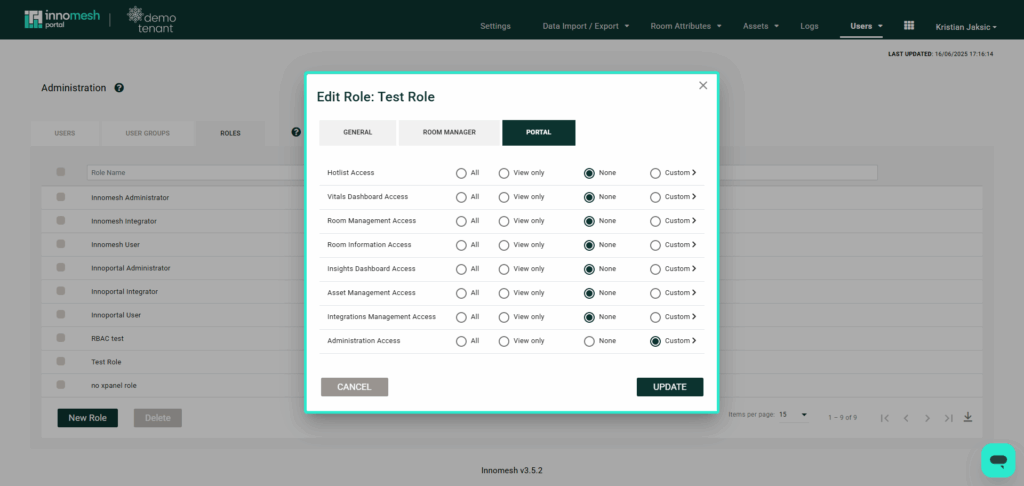
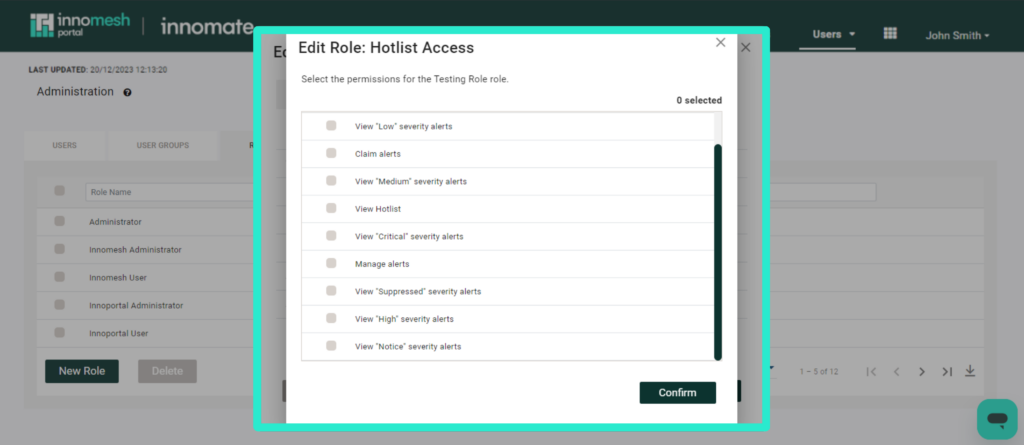
Hotlist Access
This field allows you to configure the permissions for this role within the Portal’s “Hotlist” tab.
- The “All” option allows the user to view and access all of the following:
- View “Low” severity alerts
- Claim alerts
- View “Medium” severity alerts
- View Hotlist
- View “Critical” severity alerts
- Manage alerts
- View “Suppressed” severity alerts
- View “High” severity alerts
- View “Notice” severity alerts
- The “View only” option permits users to only view all of the above.
- The “None” option restricts users from accessing the Hotlist tab.
- The “Customise” option allows you to choose the specific fields that the user can view and access within the Hotlist tab, as illustrated below:
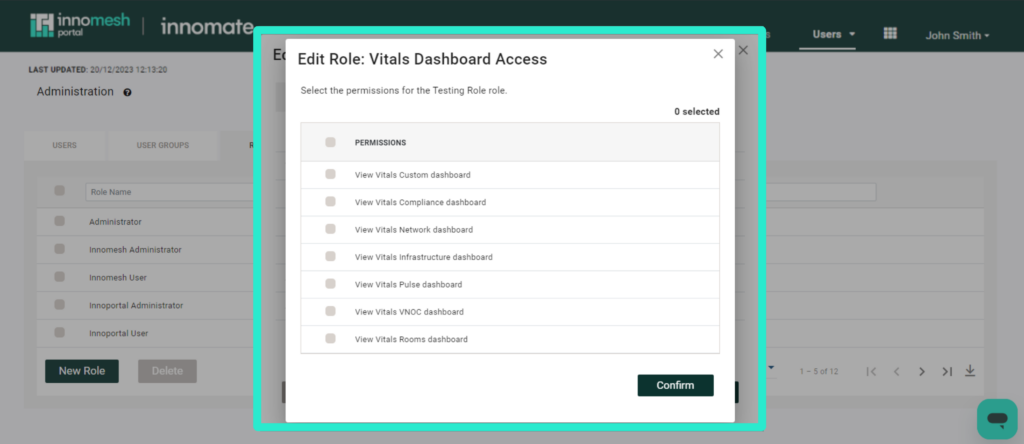
Vitals Dashboard Access
This field allows you to configure the permissions for this role within the Portal’s “Vitals Dashboard” tab.
- The “All” option allows the user to view all of the following:
- View Vitals Custom dashboard
- View Vitals Compliance dashboard
- View Vitals Network dashboard
- View Vitals Infrastructure dashboard
- View Vitals Pulse dashboard
- View Vitals VNOC dashboard
- View Vitals Rooms dashboard
- The “View only” option permits users to view all of the above.
- The “None” option restricts users from accessing the Vitals Dashboard tab.
- The “Customise” option allows you to choose the specific fields that the user can view within the Vitals Dashboard tab, as illustrated below:
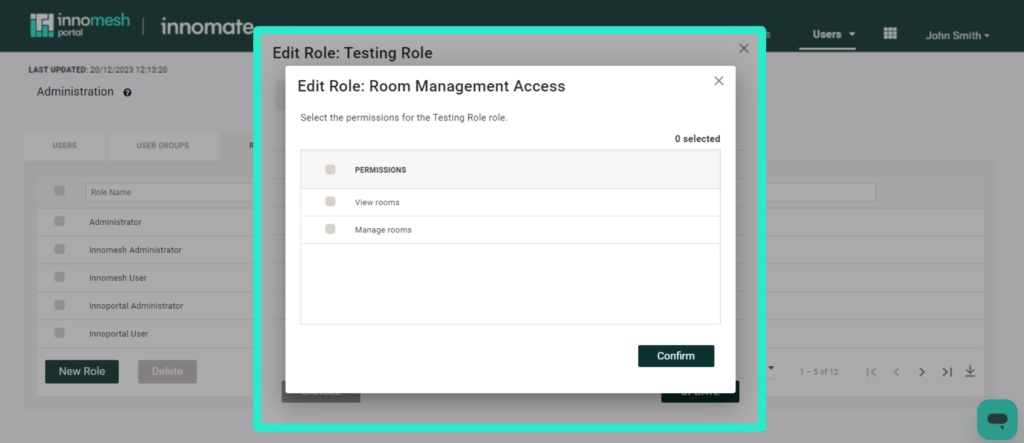
Room Management Access
This field allows you to configure the permissions for this role within the Portal’s “Rooms” tab.
- The “All” option allows the user to view and action all of the following:
- View rooms
- Manage rooms
- The “View only” option permits users to view all of the above.
- The “None” option restricts users from accessing the Rooms tab.
- The “Customise” option allows you to choose the specific fields that the user can view or action within the rooms tab, as illustrated below:
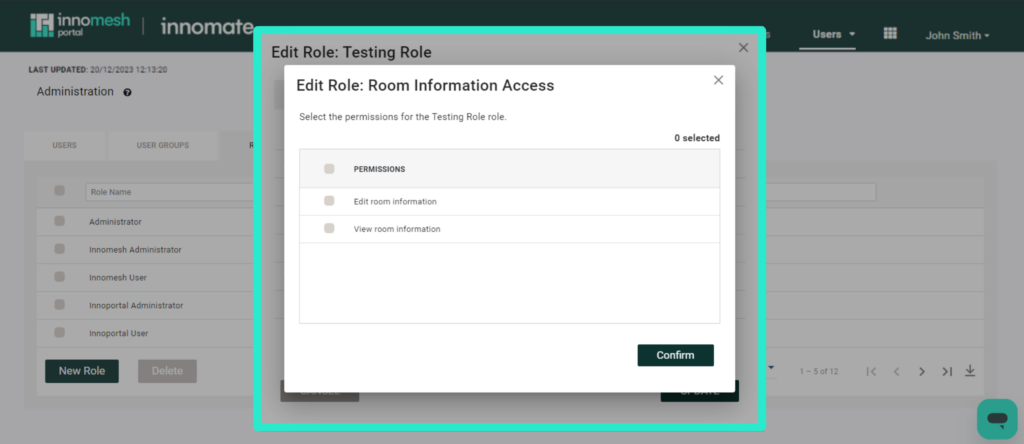
Room Information Access
This field allows you to configure the permissions for this role within the Portal’s “Information” tab.
- The “All” option allows the user to view and action all of the following:
- Edit room information
- View room information
- The “View only” option permits users to view all of the above.
- The “None” option restricts users from accessing the Information tab.
- The “Customise” option allows you to choose the specific fields that the user can view or edit within the information tab, as illustrated below:
Insights Dashboard Access
This field allows you to configure the permissions for this role within the Portal’s “Insights Dashboard” tab.
- The “All” option allows the user to view all of the following:
- View “Proactive Support” dashboard
- View “Consumption” dashboard
- View “Alerts” dashboard
- View “Rooms” dashboard
- View “Custom” dashboard
- View “Usage” dashboard
- The “View only” option permits users to view all of the above.
- The “None” option restricts users from accessing the Insights Dashboard tab.
- The “Customise” option allows you to choose the specific fields that the user can view or edit within the Insights Dashboard tab, as illustrated below:

Asset Management Access
This field allows you to configure the permissions for this role within the Portal’s “Assets” tab.
- The “All” option allows the user to view and action all of the following:
- View assets
- Perform asset operations
- Manage assets
- The “View only” option permits users to view all of the above.
- The “None” option restricts users from accessing the Asset tab.
- The “Customise” option allows you to choose the specific fields that the user can view, edit or trigger within the Asset tab, as illustrated below:

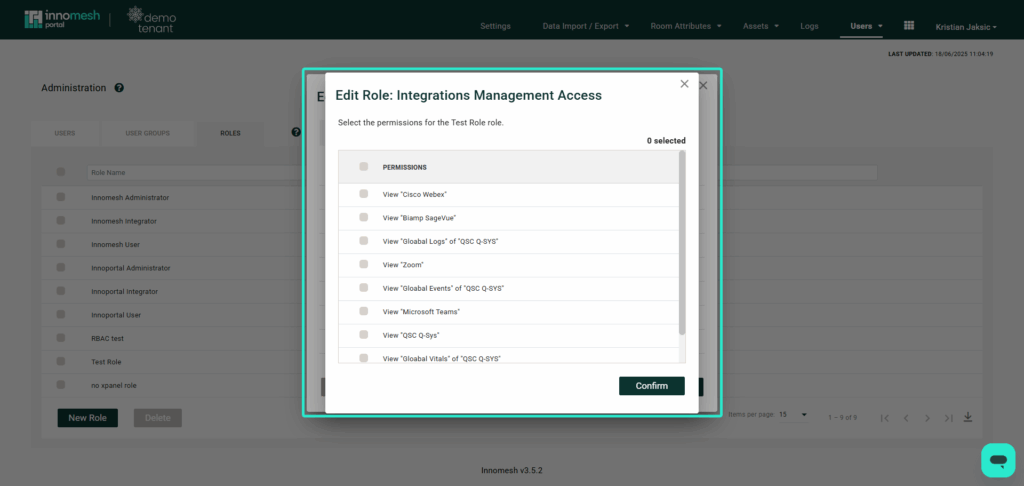
Intergrations Management Access
This field allows you to configure the permissions for this role within the Portal’s “Intergration” section
- The “All” option allows the user to view and action all of the following:
- View Intergrations
- Perform Intergrations operations
- Manage Intergrations
- The “View only” option permits users to view all of the above.
- The “None” option restricts users from accessing the Administration section.
- The “Customise” option allows you to choose the specific fields that the user can view, edit or trigger within the Intergration section, as illustrated below:
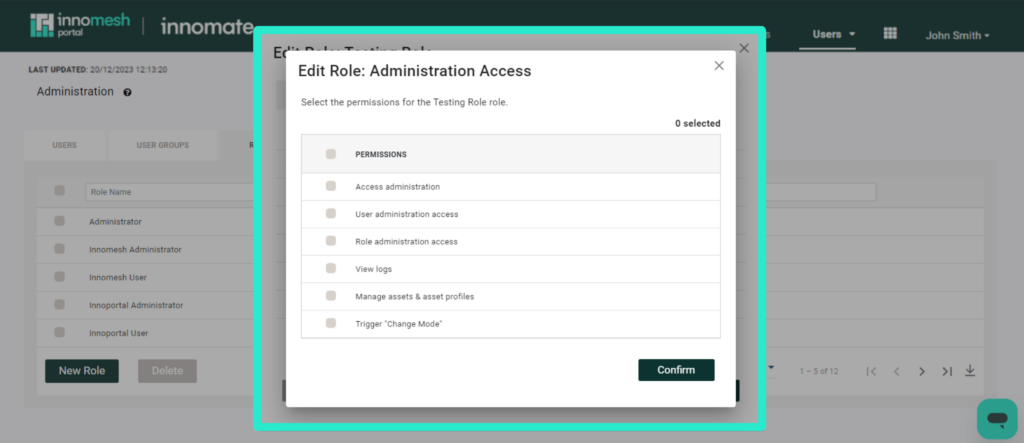
Administration Access
This field allows you to configure the permissions for this role within the Portal’s “Administration” section.
- The “All” option allows the user to view and action all of the following:
- Access administration
- User administration access
- Role administration access
- View logs
- Manage assets and asset profiles
- Trigger “Change Mode”
- The “View only” option permits users to view all of the above.
- The “None” option restricts users from accessing the Administration section.
- The “Customise” option allows you to choose the specific fields that the user can view, edit or trigger within the Administration section, as illustrated below:
Feel free to reach out to Support Team if you have any questions or inquiries regarding the setup of specific roles within your environment.