Innoportal Hotlist
Overview
The Innomesh Portal Hotlist uses real-time data gathered from the live environment to detect potential issues, and notify users to these issues by means of “hotlist alerts”.

Generally, hotlist alerts have the following properties:
- Alert name and description
- Alert creation and resolution time
- Alert severity
- Information for the room against which the alert is created, if applicable
- Information for the device against which the alert is created, if applicable
- Alert trigger condition and resolution condition/s
- Alert owner and claim time
Alert Severities
Hotlist alerts are categorised by severity levels that indicate their impact on the environment:
| Severity | Description |
| Critical | A high impact issue that can render multiple rooms in the environment to not function properly. |
| High | A high impact issue that can render a single room to not function properly. |
| Medium | A medium impact issue that can impair the operation of a single room. |
| Low | A low impact issue or informational notice that can impair the operation of a single room, or warn of a pending impairment if no action is taken. |
A list of alerts against their severities are available in this article.
Hotlist Operation
Hotlist alerts are displayed under the Innomesh Portal “Hotlist” menu. The Hotlist is divided into several tabs: “Critical”, “High”, “Medium”, “Low”, “Resolved” and “Ignored”. Each tab is explained in detail in the sections below.
Alert Grouping
Each Hotlist tab can be grouped by room if desired using the “Group by Room” toggle switch, which will provide a view of alerts of a given severity related to each room. By default, the “High”, “Medium”, “Low” and “Ignored” tabs have “Group by Room” enabled.

Once alerts are set to “Group by Room”, it is possible to perform mass operations on the room’s alerts by hovering over the room’s hamburger icon.

Alert Details
To get a more detailed view of an hotlist alert, simply click on the alert.

In this “Alert Details” view, hovering over the alert detail view’s hamburger icon will bring up a list of operations that can be performed on the alert, such as claim the alert, ignore the alert, assigning the alert to a team, and force resolving the alert.

Alert Searching & Mass Operations
The search bar allows you to filter alerts based on any of their top level properties, such as alert category, room name, asset type, alert owner and alert description. Search results are displayed in real time as the search term is entered.

Once the search term is entered, it is possible to perform mass operations on all matching alerts, by clicking on “Options >”.

The Alert Lifecycle
Detection
An alert is first generated when an issue is detected in the environment. This occurs when the alert’s trigger condition is met.
Grace Period
To avoid false positives, some alerts have a prescribed grace period, during which it is classed as “pending”. Pending alerts are not shown on the hotlist until their grace period has expired. If the alert is automatically resolved within the grace period, they are not surfaced to the Hotlist.
Active
Alerts that do not have a grace period, or whose grace period has lapsed, are surfaced to the Hotlist’s “Critical”, “High”, “Medium” or “Low” tabs and classed as “active”. The Innomesh Portal conducts continuous checks on active alerts to check if their resolution conditions are met.
Resolved
Once the Innomesh Portal determines that an active alert’s resolution conditions are met, the alert is reclassed as “resolved”, and moved to the Hotlist’s “Resolved” tab. Resolved alerts stay in the “Resolved” tab for a minimum of 15 minutes, after which they are permanently deleted.
It should be noted that while most alerts on the Innomesh Portal will resolve within 5 minutes of the problem actually resolving in the environment, there are some cases when alerts may take longer to resolve, or need to be manually resolved. These include:
- Alerts against rooms or devices that have been deleted. These may take up to 30 minutes to resolve, and can be manually resolved if desired – see the “Resolving Alerts” section below.
- Alerts against devices that have been substituted for another model. These need to be manually resolved.
- Alerts that have been specified here as unable to be resolved automatically by the Innomesh Portal.
Resurfaced
If an alert on the “Resolved” tab has its trigger condition met again, it is either reclassified as “active” if it has no grace period, or as “resurfaced” if it does have a grace period. Alerts reclassified as “active” are moved back to the “Critical”, “High”, “Medium” or “Low” tabs, while alerts reclassified as “resurfaced” remain on the “Resolved” tab, but are tagged as “Resurfaced”.

“Resurfaced” alerts are reclassified again as “active” once their grace period has lapsed, and moved to the “Critical”, “High”, “Medium” or “Low” tabs.
Ignored Alerts
The Innomesh Portal Hotlist has a mechanism to ignore alerts, to cater for cases where the trigger condition for alerts are expected to be met and do not represent issues in the environment. Ignored alerts are held in the “Ignored” tab within the Innomesh Portal Hotlist.
Ignored alerts fall under 2 categories:
Permanently Ignored Alerts
The following alerts are permanently ignored:
- “Device not connected” alerts for XPanels. XPanels are designed to be launched and closed at any time, so a disconnected XPanel does not represent an error. Note that alerts for disconnected XPanels are permanently dropped, and do not appear in the “Ignored” tab at all.
- Room and device alerts, where the room has been set as “In Maintenance” within Innomesh.
- Room and device alerts, where the room has been set as “Portable” within Innomesh. These are usually mobile AV systems that can be disconnected when unused.
- “Device not connected/communicating” alerts, where the device has been set as “In Maintenance” within Innomesh.
- “Device not connected/communicating” alerts, where the device has been set as “Portable” within Innomesh.
- “Device not connected/communicating” alerts, where the device has been set as “PDU Connected” within Innomesh, AND the room is currently powered off. This means that the device has its power cut off at the PDU, and would therefore not be responsive. Note that “PDU Connected” device alerts are permanently dropped, and do not appear in the “Ignored” tab.
User Defined Ignored Alerts
Besides permanently ignored alerts, it is also possible to ignore alerts from the Innomesh Portal, by defining “ignore rules”. Alerts can either be ignored at the “room” level, in which case all alerts are ignored for that room, or at a “device” level, in which case all alerts are ignored for a single device within a room.
Ignoring Room Alerts
To ignore all alerts for a room, click on “Ignored Alerts >”:

In the “Ignored Alerts” prompt that appear, ensure that the “Rooms” tab is selected. Type in or select a room name, specify a date and time when the alert should be ignored from and to, then click on “Add Room”.

Alternatively, if the room is already on the Hotlist, click on the hamburger menu for the room, select the “Ignore alert” option from the hamburger menu, then select “Ignore all room alerts”.

Note that if an alert remains on the Hotlist after the the specified “ignored until” date and time, the alert will be moved back to the “Critical”, “High”, “Medium” or “Low” tabs.
Ignoring Device Alerts
To ignore all alerts for a device, click on “Ignored Alerts >”:

In the “Ignored Alerts” prompt that appear, ensure that the “Assets” tab is selected. Type in or select a room name and an asset ID, specify a date and time when the alert should be ignored from and to, then click on “Add Asset”.
Note that the “asset ID” can be found under the “Alert Details” view for the alert you wish to ignore.

Alternatively, open the “Alert Details” view of the alert you wish to ignore by clicking on the alert, hover over the hamburger icon, then click “Ignore Alert”. This will prepopulate the Ignored Alerts window. Select a date and time to ignore the alert until, then click on “Add Asset”.

Note that when an alert is ignored, it does not immediately move to the “Ignored” tab, but will move at the next alert resolution check cycle, typically within 2 minutes.
Claiming & Adding Comments to Alerts
Claiming an Alert
Claiming an alert allows you to take ownership of an alert, informing other Hotlist users that the alert is being taken care of by you.
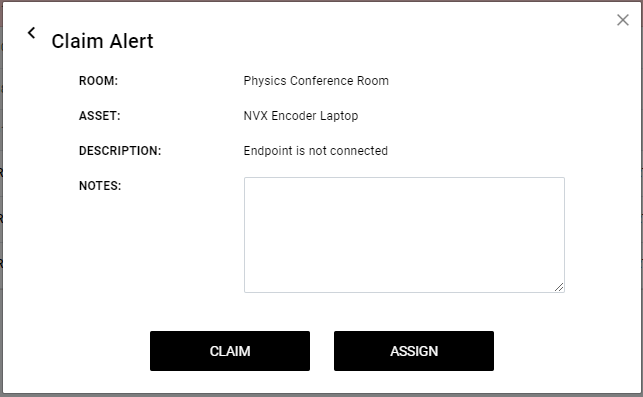
To claim an alert, open the “Alert Details” view of the alert you wish to claim, hover over the hamburger icon, then click “Claim Alert”.

In the next window, click on “Claim”. You can also add notes to the alert here if desired.

Once claimed, your name appears against the alert.

Note that only active and ignored alerts can be claimed. Resolved alerts cannot be claimed.
Also note that unclaimed alerts appear in red, and appear at the top of the Hotlist.
Assigning an Alert
Besides claiming an alert, it is also possible to assign an alert to a group or a team within your organisation. To do this, first select “Assign Alert” from the hamburger menu on the “Alert Details” view.

Then select the group or team you wish to assign the alert to.

Note that it is not possible to assign an alert directly to another user.
Adding Alert Notes
It is possible to add notes to an alert to inform others of your progress, and to provide any other updates related to the alert. Alert notes are viewable when hovering over the alert in the main Hotlist view, and can be updated after the alert is claimed.

To add a note to an alert, open the “Alert Details” view of the alert you wish to add a note to, hover over the hamburger icon, then click “Update Alert”.

Add the note under the “Notes” text box, then click “Update”.
Unclaiming an alert
You can unclaim an alert that you have claimed, by clicking on the “Unclaim Alert” option under the alert’s hamburger menu, then clicking “Yes, Unclaim”.

Note that when an alert is unclaimed, comments added to the alert will be retained.
Resolving Alerts
When an underlying issue causing an alert has been resolved, the alert will generally automatically move to the “Resolved” tab within 5 minutes, where it will stay for a minimum of 15 minutes before being deleted.
Alerts can also be manually resolved, by hovering over the hamburger icon in the “Alert Details” view, then clicking on “Resolve Alert”.

It should be noted, however, that if the underlying issue causing the alert is not resolved, the alert trigger condition will be met again and the alert will be resurfaced. It is therefore recommended that the underlying issue causing the alert is resolved first.
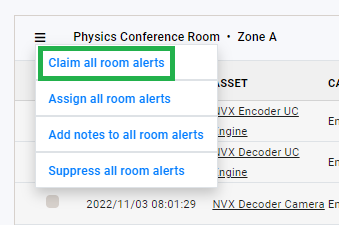
Mass alert operations
Alerts that are assigned to a room can be claimed, assigned, have notes added to them, and ignored en-masse, through the hamburger button next to each room:
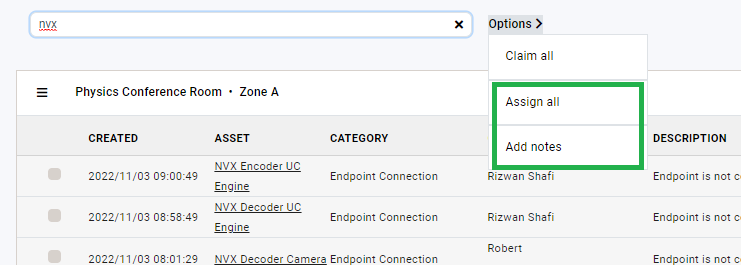
It is also possible to claim, assign and add notes to multiple alerts fulfilling a specific search criteria. To do this, enter the search criteria in the search box, then click on “Options >”:
Have more questions? Submit a request