Overview
The Innomesh integration with ServiceNow CMDB provides a bi-directional data exchange between Innomesh and an organisation’s ServiceNow instance. This integration enables controlled room creation workflows, automatic synchronisation of room and device information, enforcement of device standards, and detection of hardware changes across your audiovisual environment.
The integration covers three key areas:
- Room Build Approval — Control which rooms can be created in Innomesh, based on approvals managed in ServiceNow.
- Room & Device Information Synchronisation — Synchronise room and device metadata between ServiceNow and Innomesh, both at onboarding and on a daily schedule.
- Device Swap-Out Detection — Detect when devices are replaced and notify ServiceNow automatically.
Room Build Approval
Room Build Approval allows administrators to control which rooms can be created in Innomesh. When enabled, users creating a room are presented with a list of pre-approved rooms sourced from ServiceNow, rather than the standard template selection screen.
Enabling Room Build Approval
Room Build Approval is a tenant-level feature that can be enabled or disabled. When disabled, the standard room creation workflow remains unchanged.
Creating a Room from an Approval
When Room Build Approval is enabled, clicking Add New Room + in Innomesh Room Manager presents a Select a Room page instead of the standard template selection.
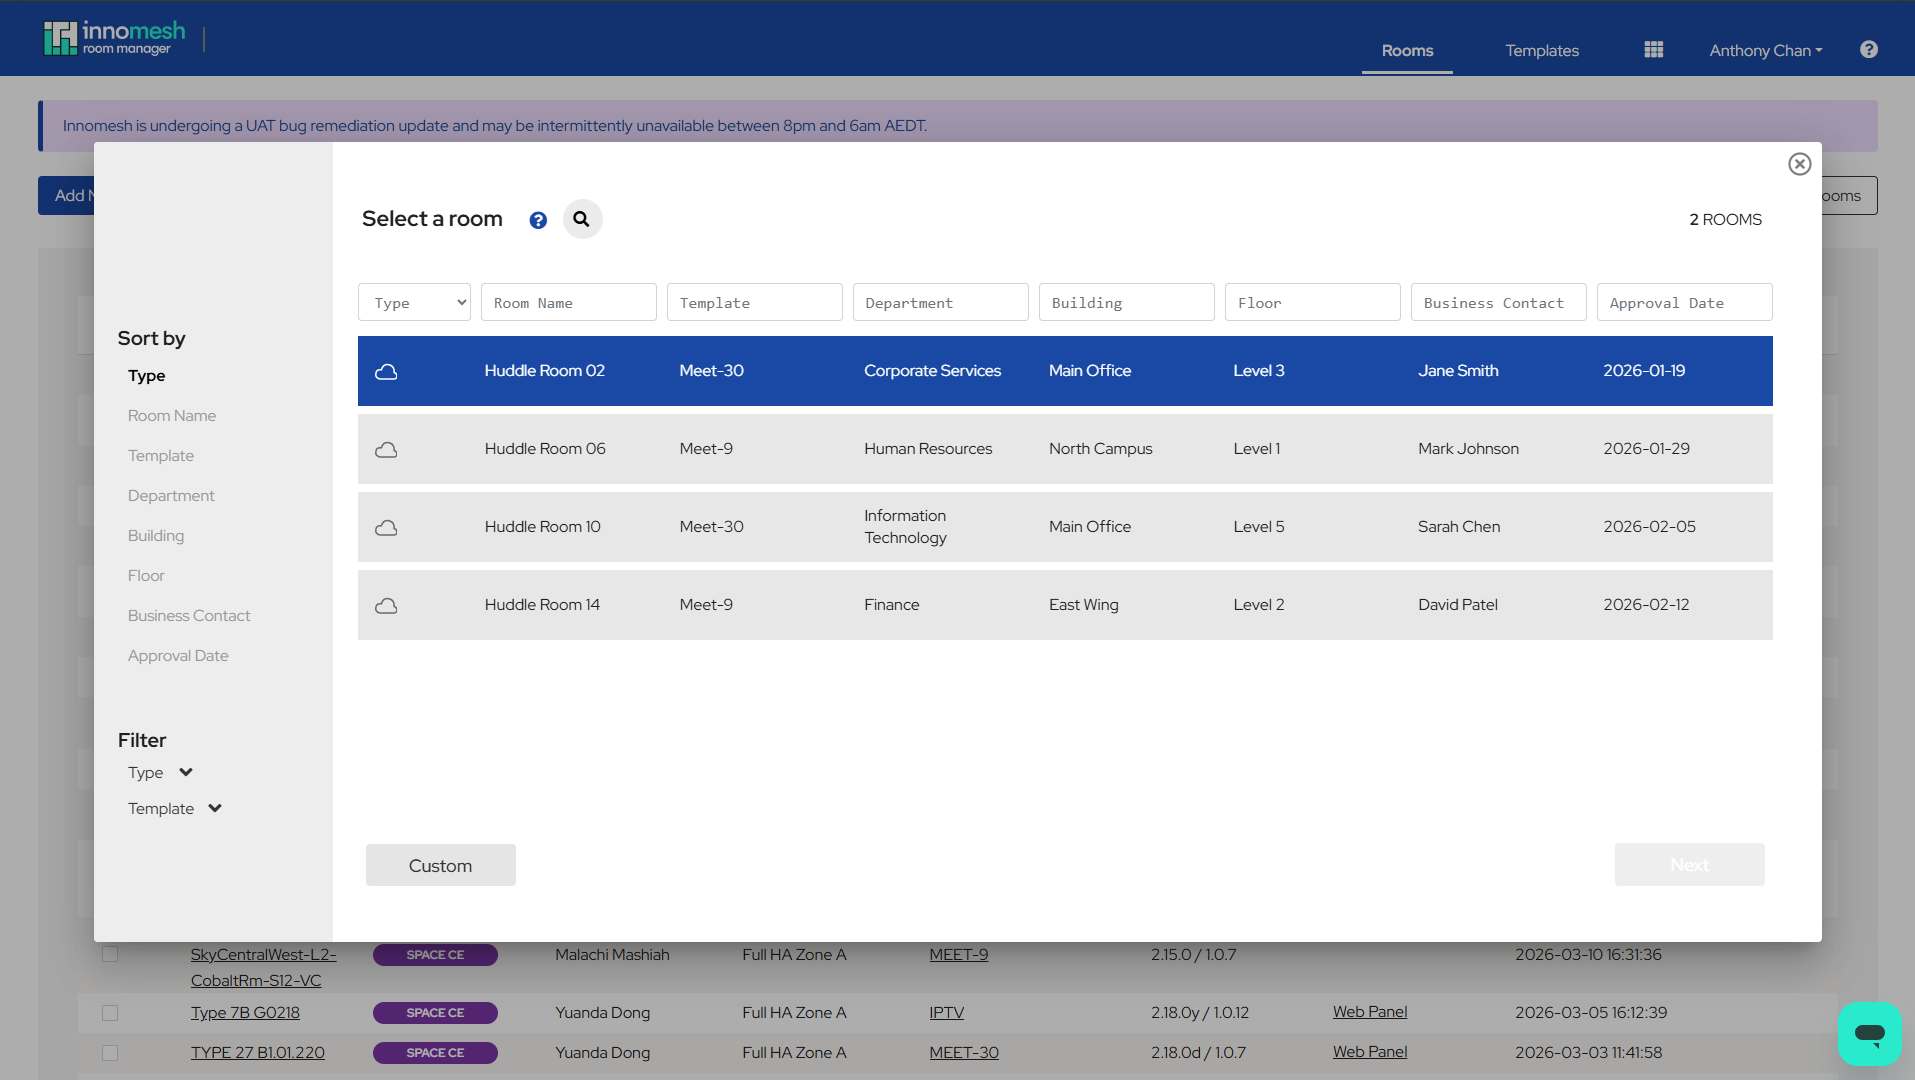
Each row represents a room that has been approved for creation in ServiceNow. The page includes the following information:
| Column | Description |
|---|---|
| Room Name | The name of the room as defined in ServiceNow (typically the Outlook resource account name). |
| Organisation | The organisation the room belongs to. |
| Building / Floor / Space | Location metadata for the room. |
| Template | The Innomesh template(s) approved for this room. If multiple templates are approved, this appears as a dropdown. |
| Type | The subscription tier (Pulse, Sight, Space CE, or Space VC), determined by the selected template. |
To create a room from an approval:
- Click Add New Room + in Room Manager.
- On the Select a Room page, locate the room to create. Use column filters to narrow the list if needed.
- If multiple templates are available, select the desired template from the Template dropdown. The Type icon updates to reflect the selected template’s subscription tier.
- Click the room row to select it, then click Next.
- Select the zone to deploy the room to, then proceed with the standard room creation workflow.
The list of approved rooms is filtered based on the logged-in user’s User Group. Only rooms approved for the user’s organisation are shown. If no room approvals are available, the message “No new room approvals are available” is displayed.
Room metadata from the approval (such as the ServiceNow Service Instance ID and resource account name) is automatically captured and added to the room’s information during creation. This includes the Room UID, which corresponds to the room’s Configuration Item sys_id in ServiceNow and is used to correlate the room between both systems for all subsequent synchronisation.
Custom Room Creation
For administrative users who need to bypass the approval process, a Custom button is available on the Select a Room page. This returns the user to the standard template selection workflow.
ServiceNow Notification on Room Creation
When a room is created successfully, Innomesh automatically notifies ServiceNow as an additional step in the room deployment process. This step appears in the room creation progress indicator alongside the standard deployment steps.
The notification includes the room name, template used, creation timestamp, the user who created the room, and their user group. This allows ServiceNow to update its records and track that the room has been installed.
Room Information Synchronisation
Room information synchronisation pulls data from ServiceNow into Innomesh, ensuring that room metadata stays current across both systems. This occurs at two points: when a room is first created, and on a daily schedule thereafter.
Room Information at Onboarding
When creating a new room, Innomesh requests available room data from ServiceNow and pre-populates the room’s Information fields. This includes data such as building name, floor level, seating capacity, and contact details.
The Information tab is now integrated into the room creation workflow alongside the Configuration tab. When creating a room:
- Select the room and template as usual.
- Navigate freely between the Configuration and Information tabs before deploying.
- Fields that have been pre-populated from ServiceNow appear with their values already filled in.
- Click Create to deploy the room. Both the configuration and information are saved together.
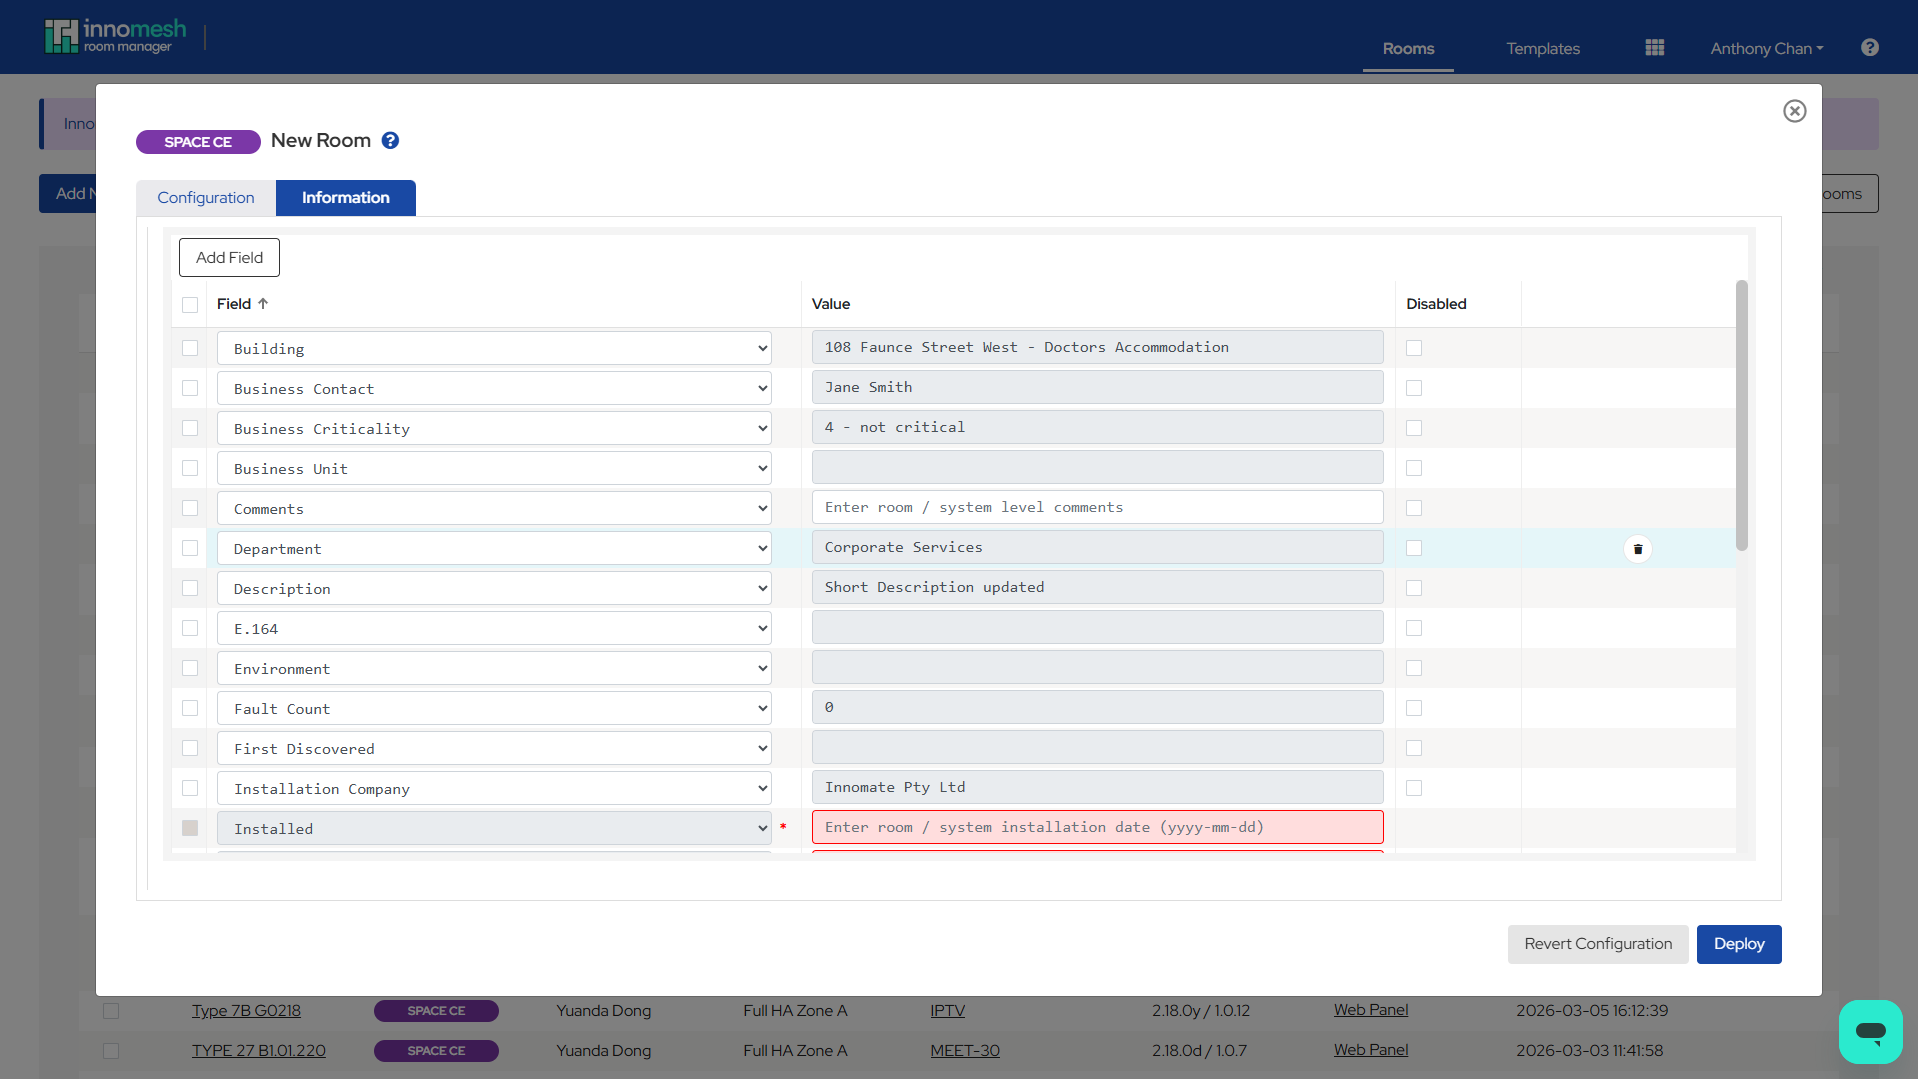
If the configuration template is not already mapped to an information template, a prompt appears during room creation asking which information template to use. Users also have the option to disable room information for that room by checking Disable room information.
Scheduled Room Information Sync
Once a day, Innomesh pulls updated room information from ServiceNow for all onboarded rooms. This ensures that changes made in ServiceNow (such as updated contact details or cost centre information) are reflected in Innomesh.
The synchronisation:
- Runs automatically overnight at a scheduled time configured for your tenancy.
- Uses the field ServiceNow Alias to map ServiceNow field names to Innomesh room information fields.
Automatic Room Renaming
If a room’s name is changed in ServiceNow, Innomesh detects the mismatch during the scheduled synchronisation and automatically triggers a room rename. The rename updates the room name across all internal Innomesh systems.
Device Information Synchronisation
Device information synchronisation allows device metadata stored in ServiceNow (such as serial numbers, MAC addresses, and warranty information) to be imported into Innomesh devices. This reduces manual data entry and keeps device records consistent across both systems.
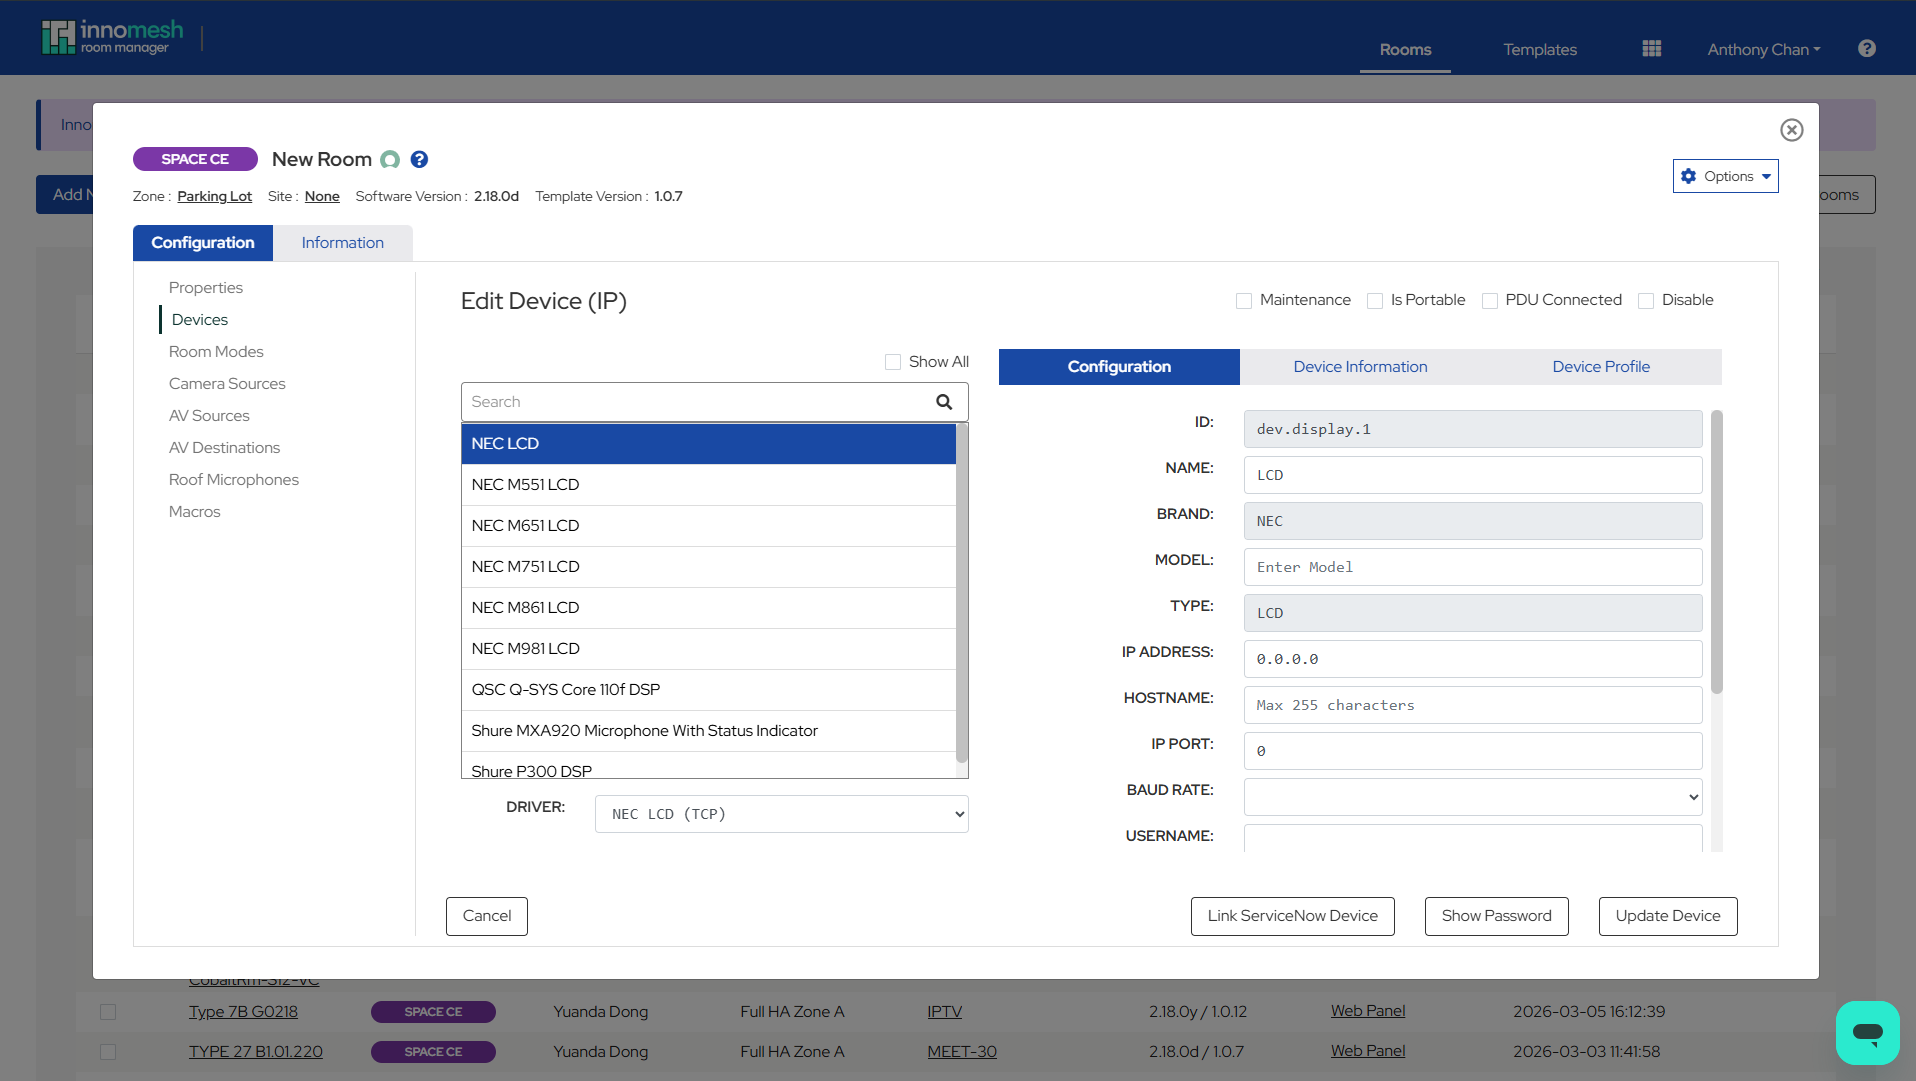
Importing Device Information from ServiceNow
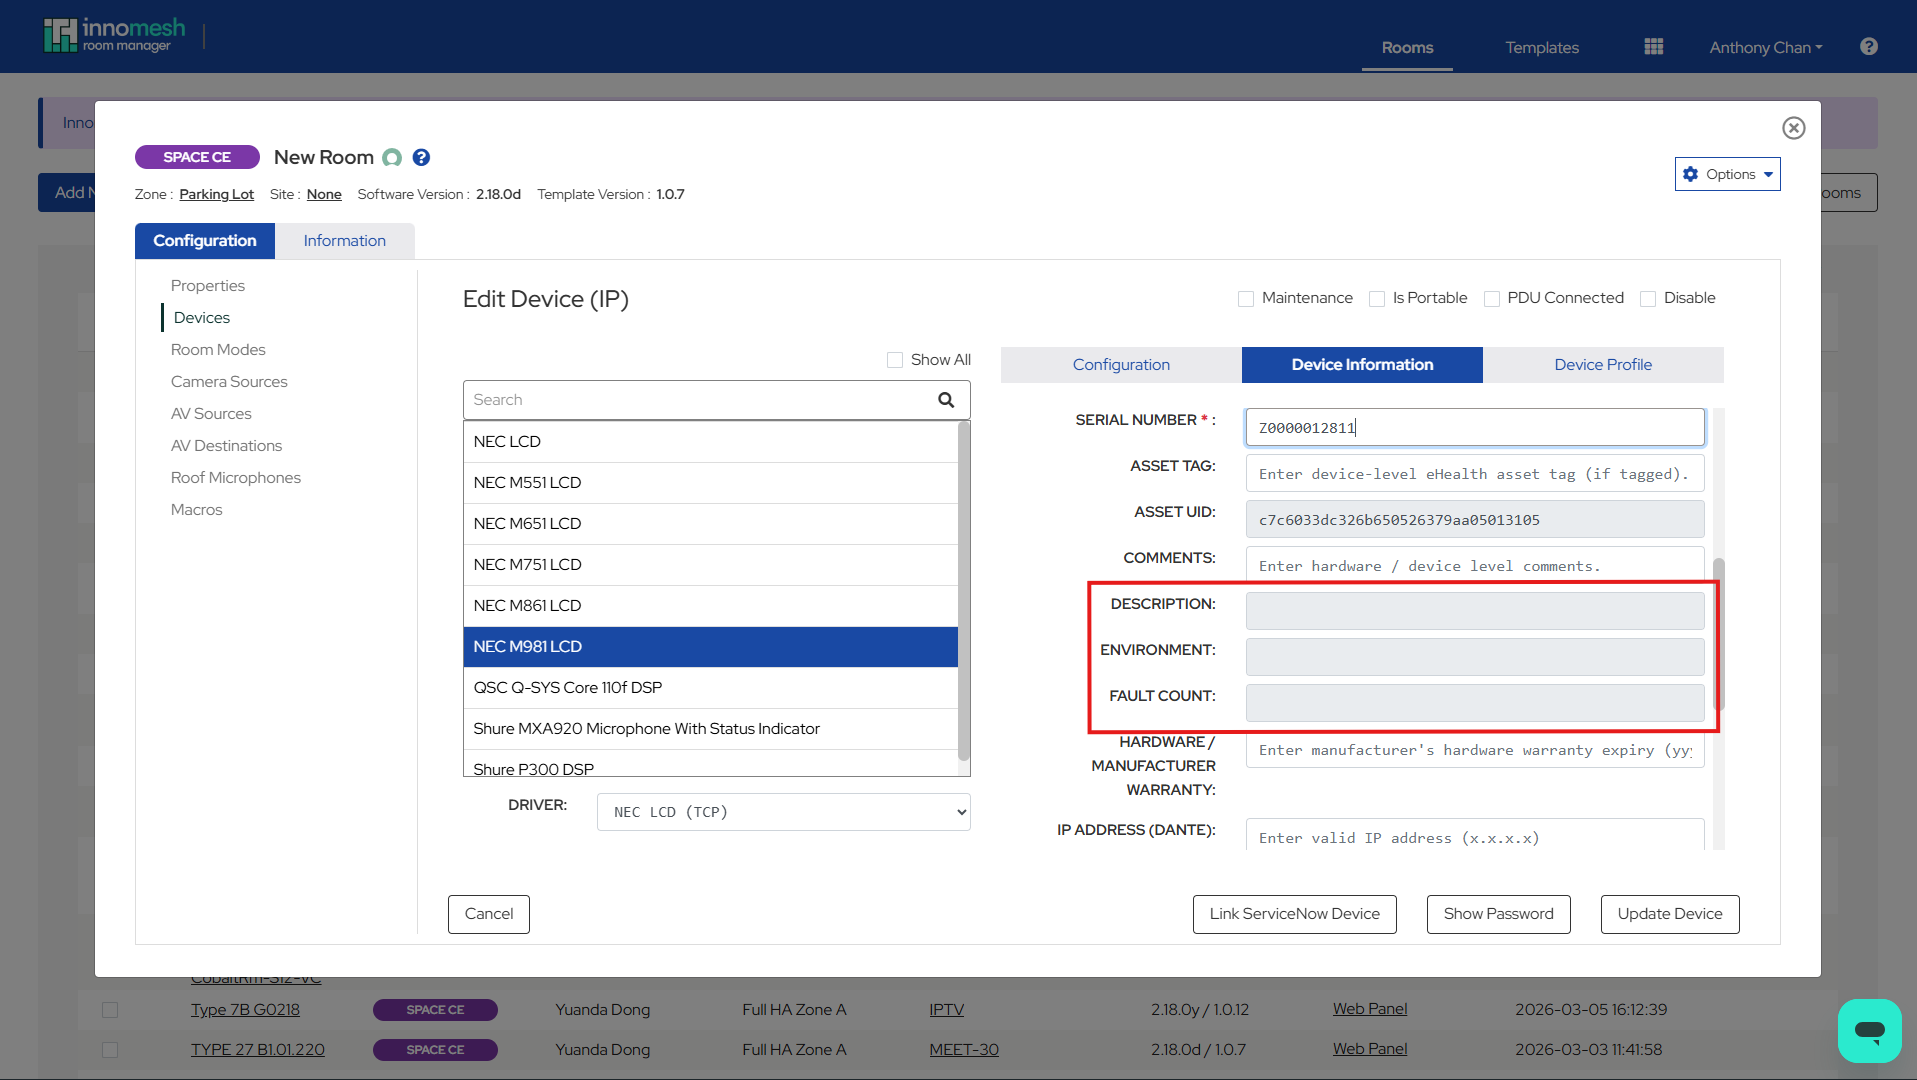
When creating or editing a room, device information from ServiceNow is available for import. This data is not automatically applied — users explicitly choose to import it.
To import device information:
- Open a device in Room Manager and navigate to the Device Information tab.
- Click Import to view available ServiceNow device data for this room.
- In the Import Device Information modal, select the ServiceNow device to import from.
- Review the pre-populated fields. Override any values if needed.
- Click OK to apply the imported data.
The critical field in this import is the Asset UID, which corresponds to the device’s Configuration Item sys_id in ServiceNow. In ServiceNow terms, each Innomesh device (or “asset”) maps to a Configuration Item (CI) in the CMDB. The Asset UID is the link between the two, and is used for all subsequent synchronisation between Innomesh and ServiceNow.
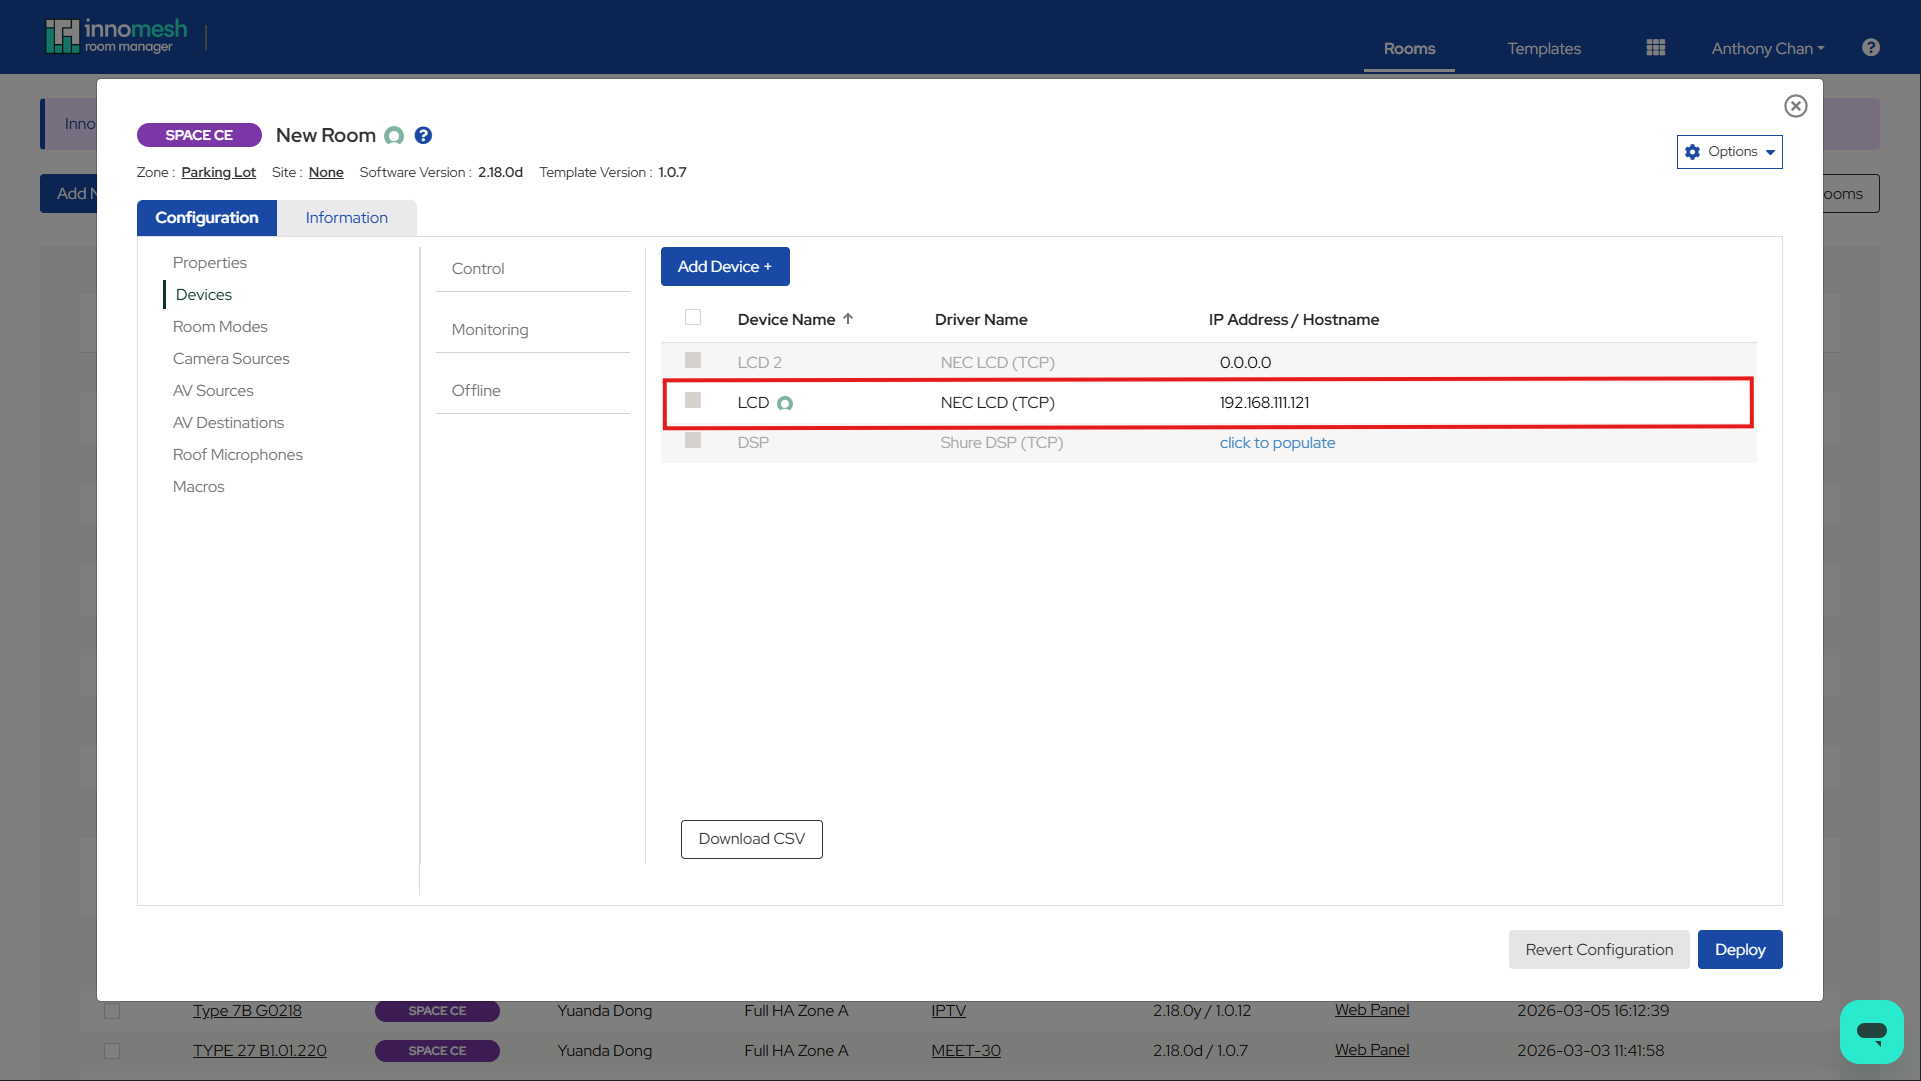
Linking Devices to ServiceNow
For devices that are not yet tracked in ServiceNow, you can manually link them so that Innomesh creates a corresponding record in ServiceNow on the next room deployment.
To link a device to ServiceNow:
- In Room Manager, hover over the device row and click the Link ServiceNow Device icon (chain link icon).
- In the Link ServiceNow Device dialog, select an existing ServiceNow device to link to, or click Link New to create a new ServiceNow record.
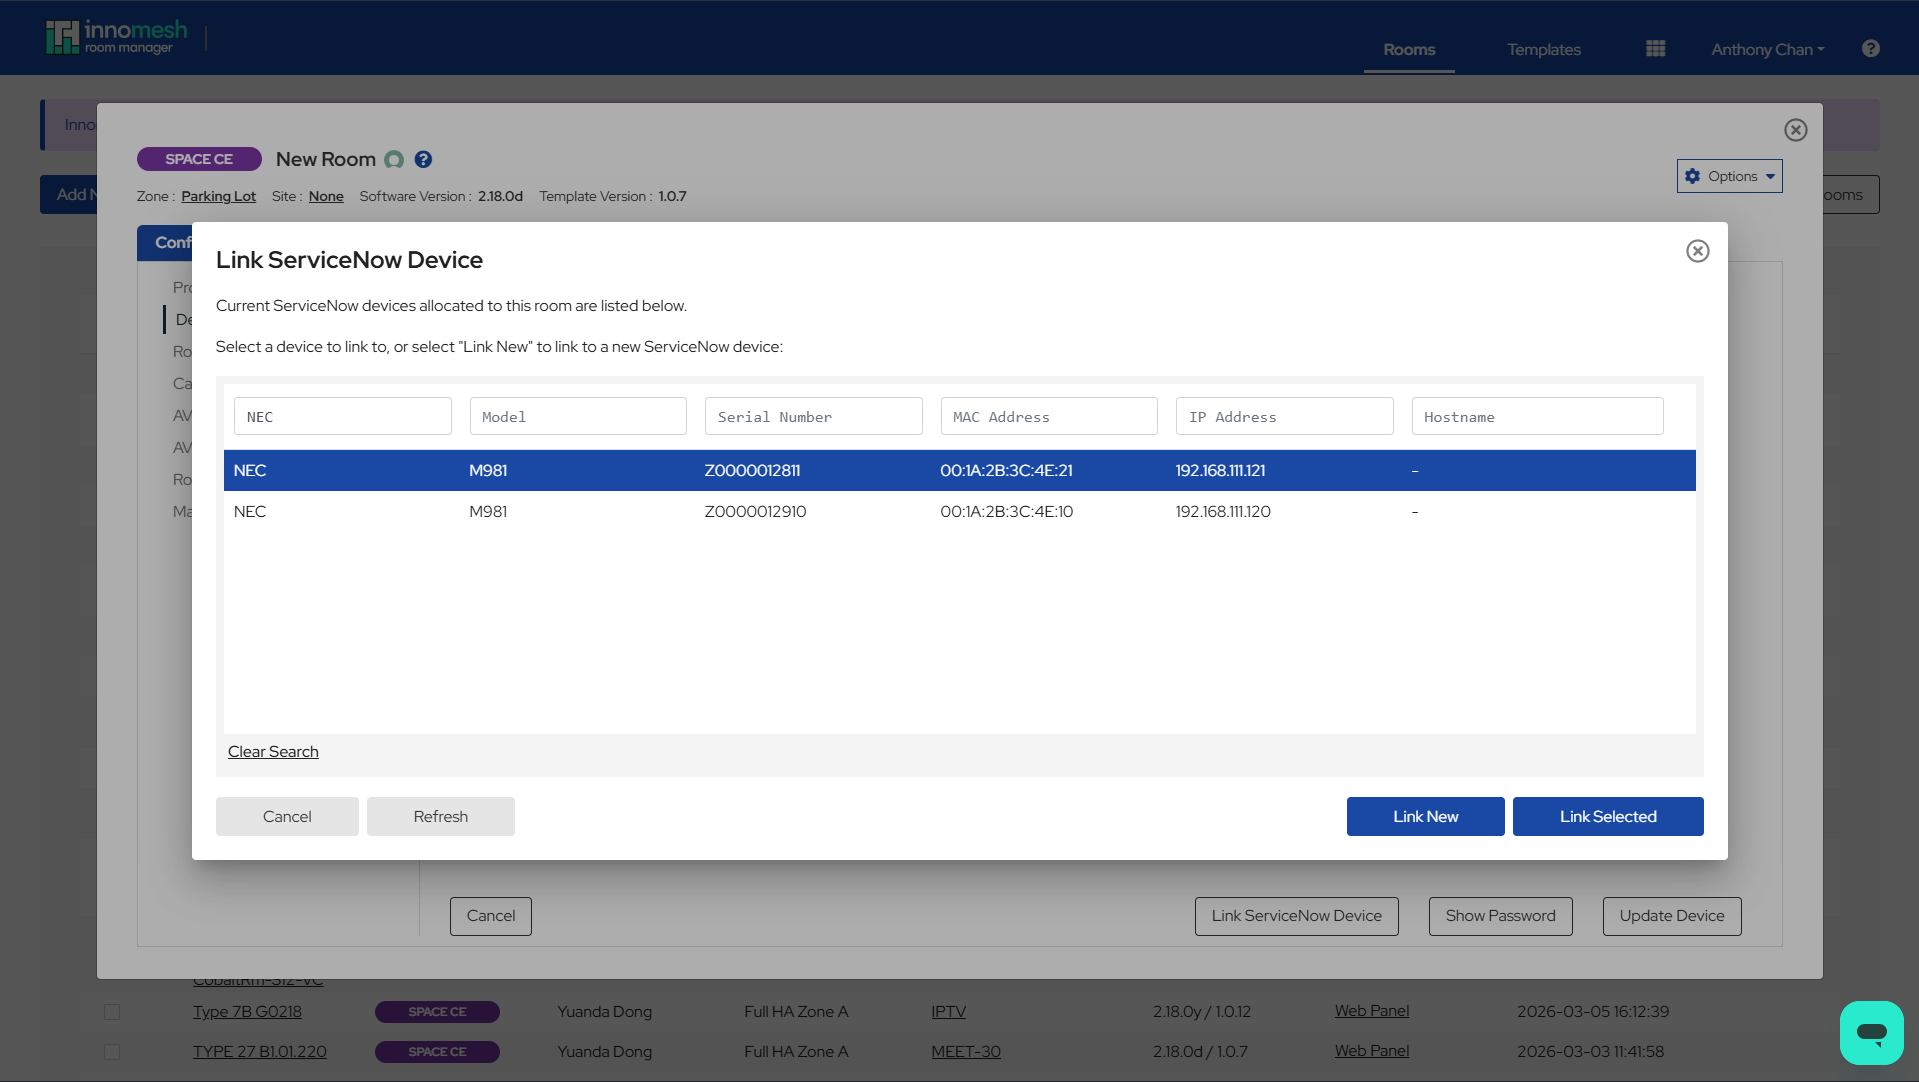
- Click Update Device to save. A ServiceNow icon appears next to the device name, confirming it is linked.
Scheduled Device Information Sync
Once a day, Innomesh pulls updated device information from ServiceNow for all devices that have been linked (i.e., have an Asset UID). This ensures that changes to device metadata in ServiceNow are reflected in Innomesh.
The synchronisation:
- Runs automatically overnight at a scheduled time configured for your tenancy.
- Only updates devices that have a valid Asset UID linking them to ServiceNow.
- Uses the ServiceNow Alias on asset fields to map ServiceNow field names to Innomesh fields.
- Excludes fields that could affect device control (such as Name, IP Address, IP Port, Hostname, Brand, Model, and Category) to prevent accidental disruption.
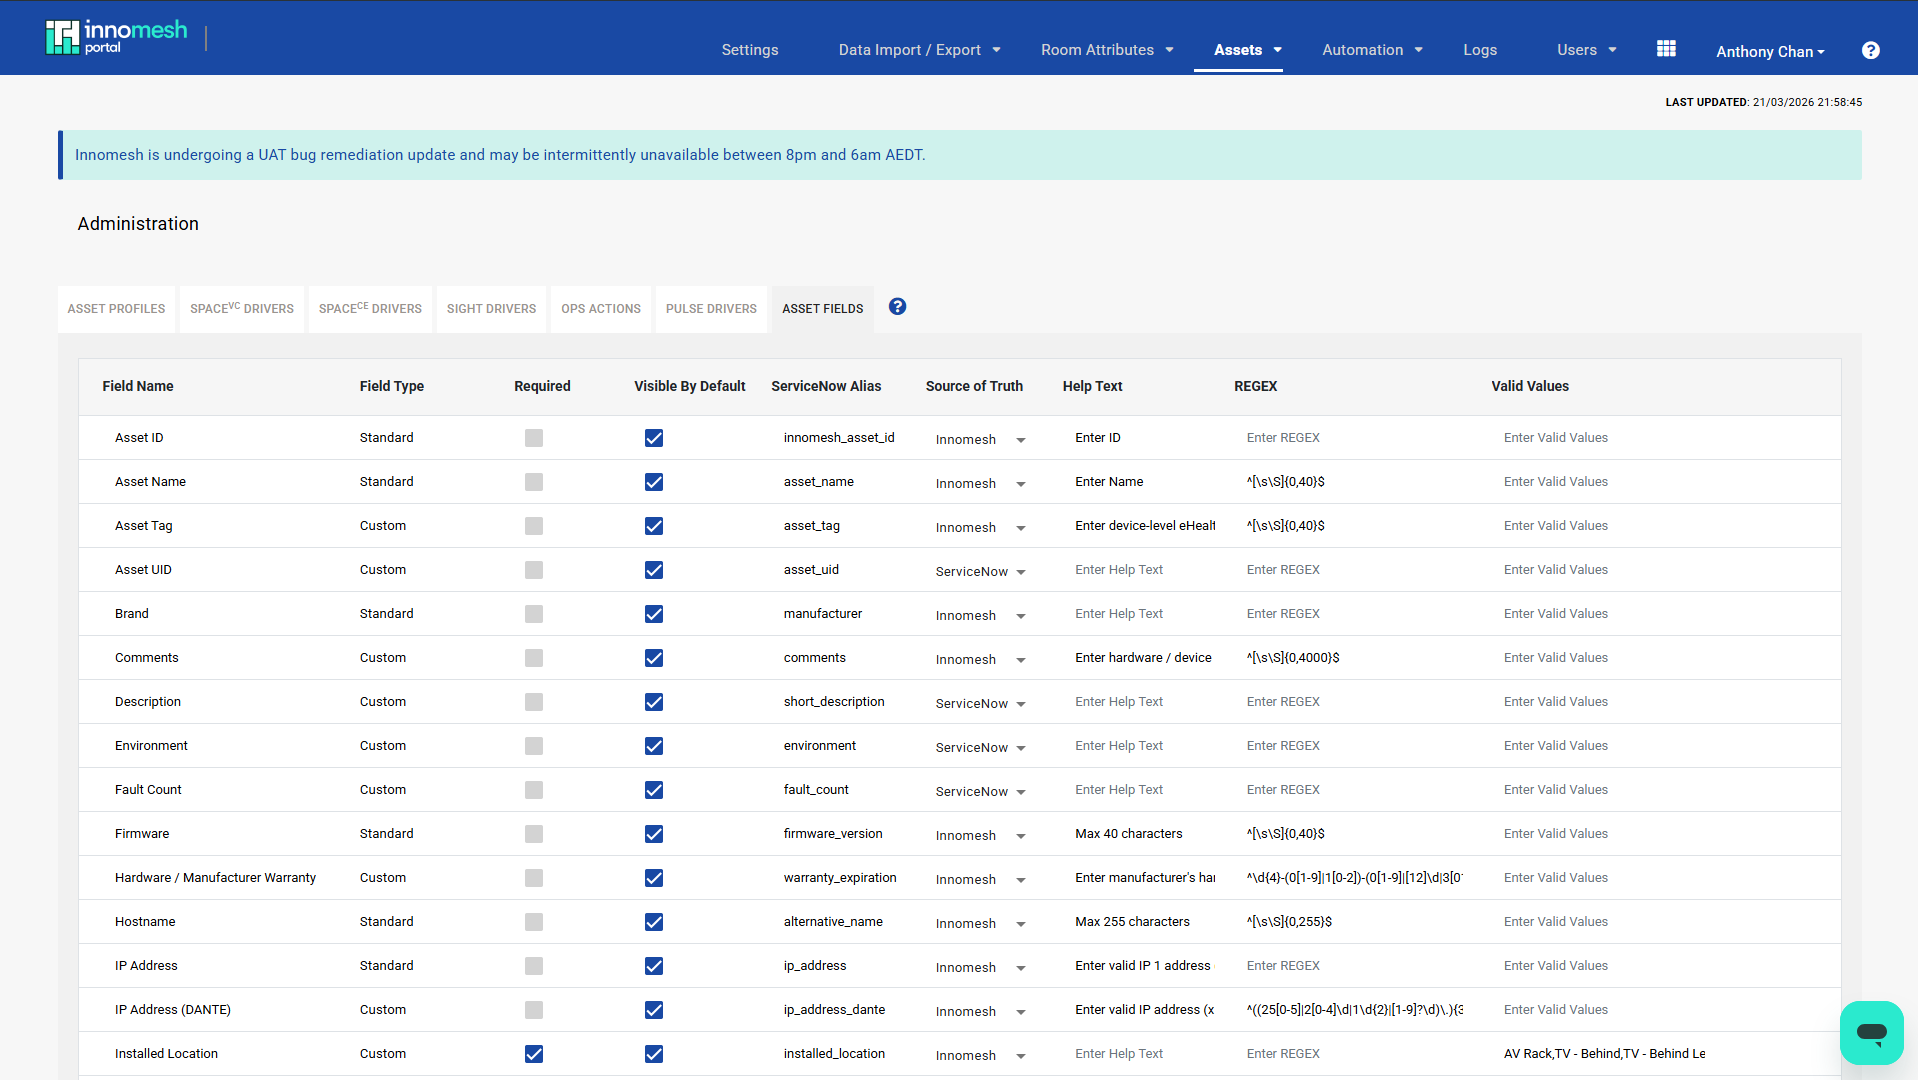
Asset Field Management
The Asset Fields configuration in Innomesh Portal allows administrators to define how device fields behave, including validation rules, help text, dropdown values, and how they map to ServiceNow. These settings are managed under Assets → Asset Fields in the Innomesh Portal Administration page.
Asset Field Configuration
Each asset field has the following configurable properties:
| Property | Description |
|---|---|
| Field Name | The display name of the field. |
| Field Type | Standard (built-in device fields like IP Address, Brand) or Custom (user-defined fields). |
| Required | Whether the field is mandatory. See Required Fields and Compliance Alerts. |
| Visible By Default | Whether the field is shown by default on device views. |
| ServiceNow Alias | The corresponding ServiceNow field name, used for data mapping during synchronisation. |
| Source of Truth | Whether Innomesh or ServiceNow is the authoritative source for this field’s value. |
| Help Text | Instructional text displayed as a placeholder and tooltip in Room Manager. |
| REGEX | A regular expression for field validation. |
| Valid Values | A comma-separated list of acceptable values, presented as a dropdown in Room Manager. |
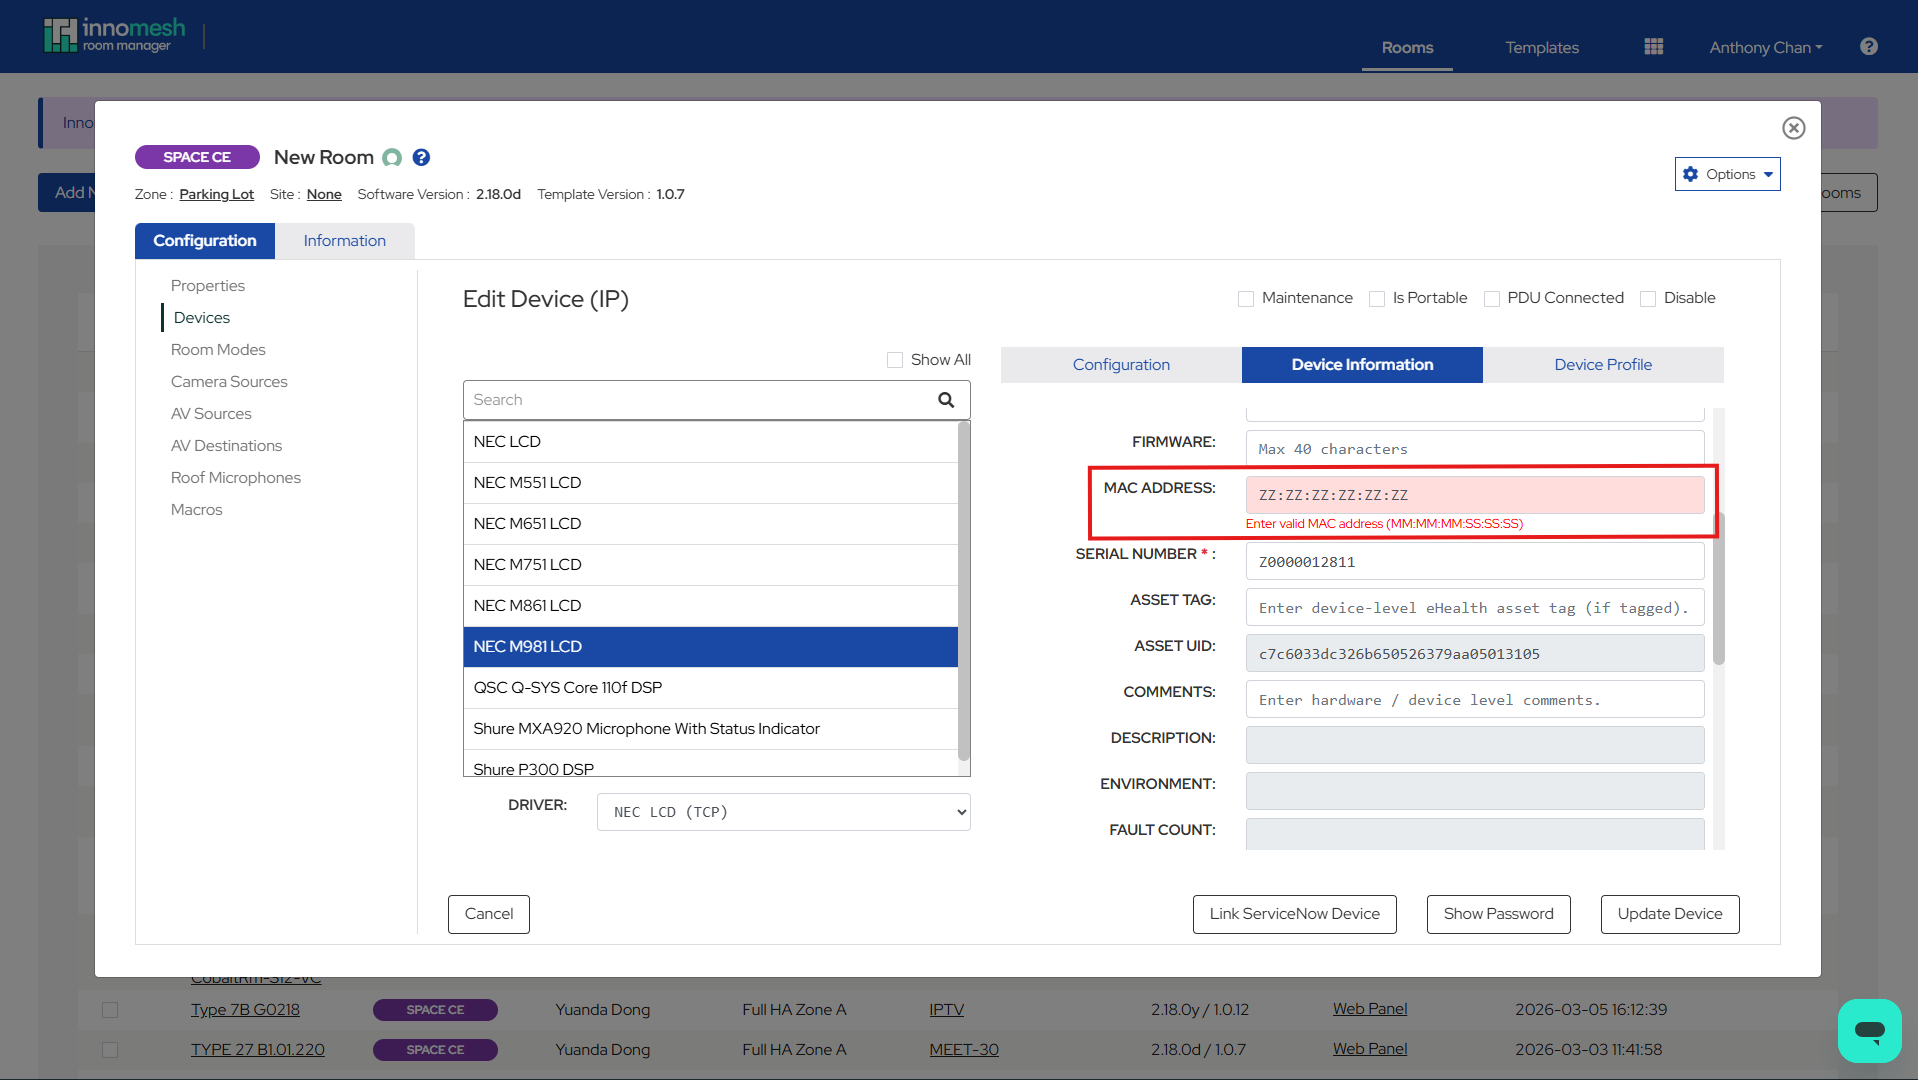
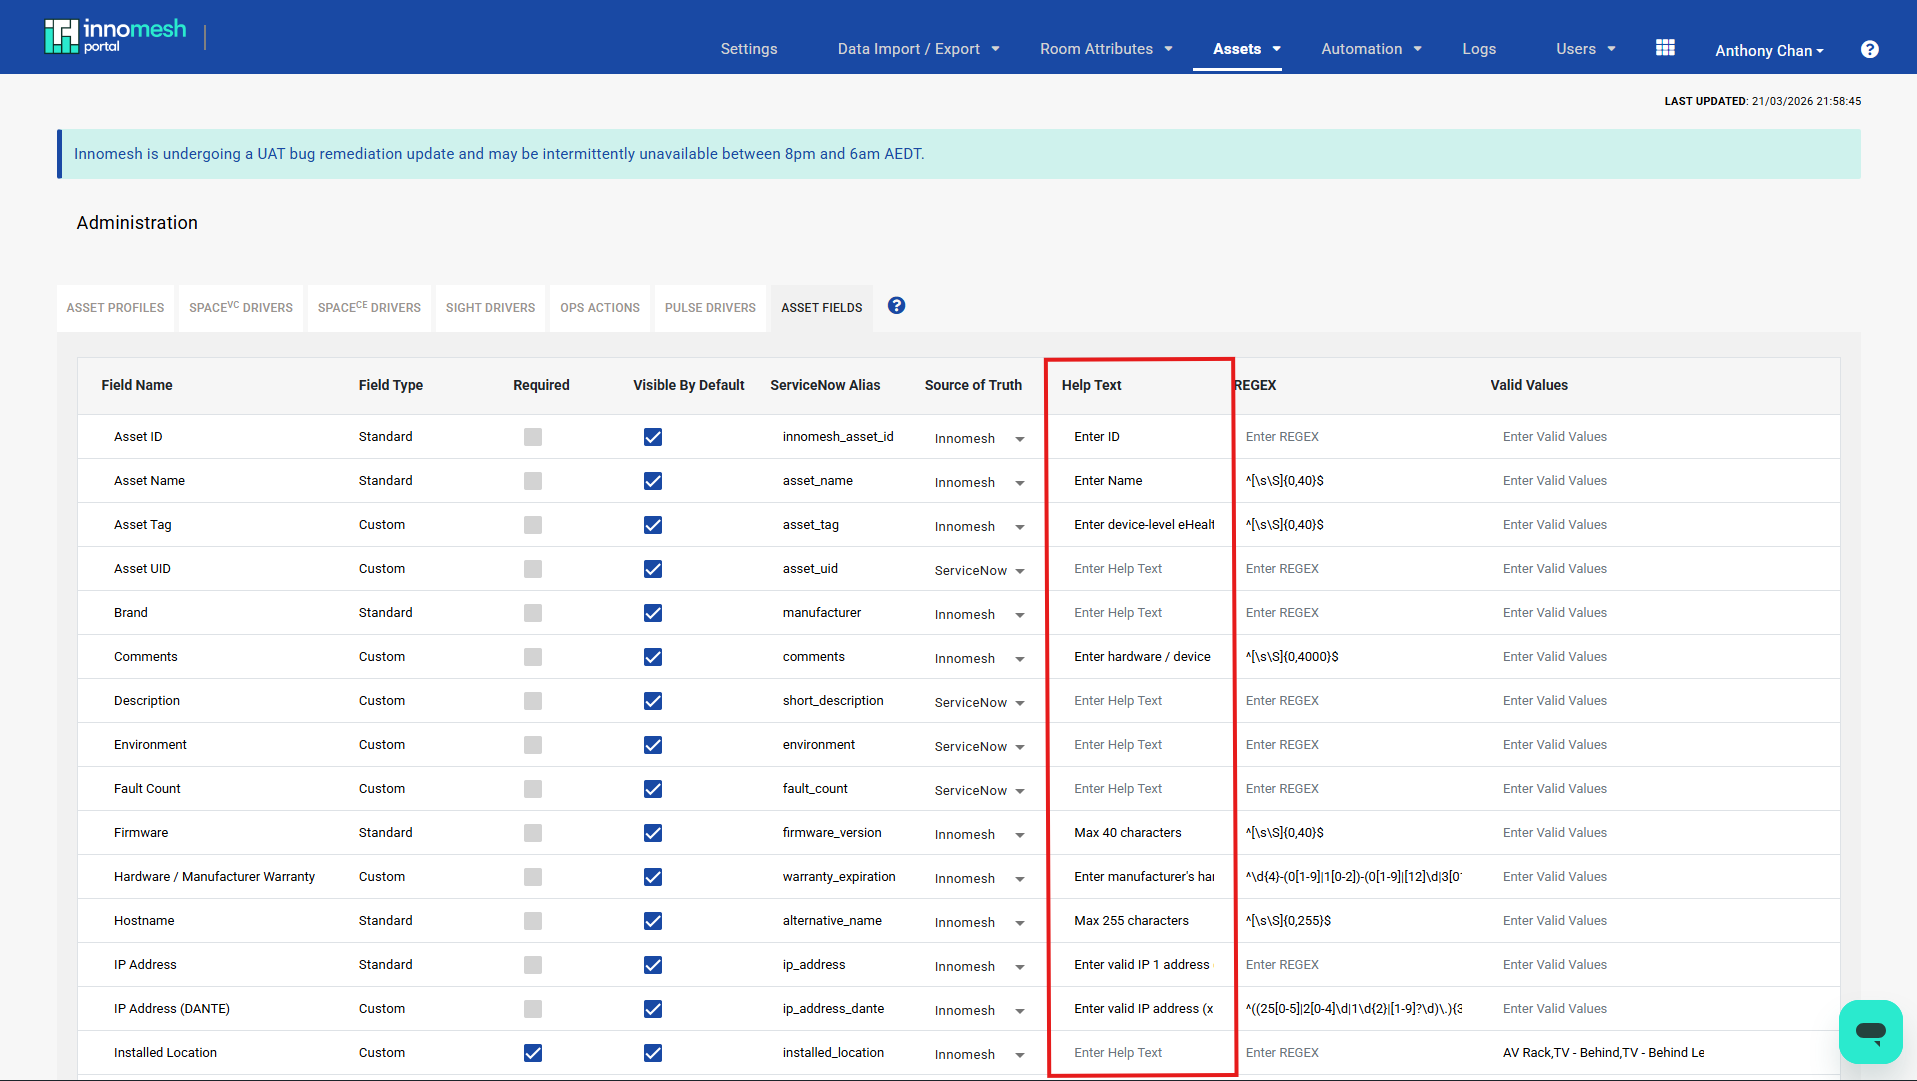
Field Validation (REGEX)
ServiceNow CMDB fields often have format restrictions — for example, date fields that must follow a specific pattern, or text fields with a maximum length. To prevent validation errors during synchronisation, configure matching REGEX patterns on the corresponding Innomesh asset fields. This ensures that values entered in Innomesh are accepted by ServiceNow.
When a REGEX pattern is defined for a field, Room Manager checks the entered value against the pattern and displays a warning if the value does not match.
To configure field validation:
- Navigate to Assets → Asset Fields in Innomesh Portal Administration.
- Locate the field and enter a REGEX expression in the REGEX column.
- Save the changes.
The following table shows practical examples of REGEX patterns and how they align with common ServiceNow field restrictions:
| Field | REGEX Pattern | Purpose | Recommended Help Text |
|---|---|---|---|
| Hardware/Manufacturer Warranty | ^\d{4}-(0[1-9]|1[0-2])-(0[1-9]|[12]\d|3[01])$ |
Enforces a YYYY-MM-DD date format, matching ServiceNow’s date field requirement. |
Enter manufacturer’s hardware warranty expiry (yyyy-mm-dd) |
| MAC Address | ^([0-9A-Fa-f]{2}:){5}[0-9A-Fa-f]{2}$ |
Enforces the colon-separated hex format required by ServiceNow (e.g., D4:92:34:42:34:72). |
Enter valid MAC address (MM:MM:MM:SS:SS:SS) |
| IP Address | ^((25[0-5]|2[0-4]\d|1\d{2}|[1-9]?\d)\.){3}(25[0-5]|2[0-4]\d|1\d{2}|[1-9]?\d)$ |
Validates standard IPv4 address format. | Enter valid IP address (x.x.x.x) |
| Firmware / Serial Number / Asset Name | ^\S{0,40}$ |
Restricts to a maximum of 40 non-whitespace characters, matching the ServiceNow field length limit. | Max 40 characters |
| Comments | ^[\s\S]{0,4000}$ |
Allows any characters up to 4000, matching a ServiceNow text area limit. | Enter hardware / device level comments |
When configuring REGEX validation, it is strongly recommended to also configure Help Text for the same field. REGEX patterns are not visible to Room Manager users, so without help text they have no way of knowing the expected format. Help text appears as placeholder text within the field and as a tooltip on hover, giving users clear guidance on what to enter.
To configure help text:
- Navigate to Assets → Asset Fields in Innomesh Portal Administration.
- Enter the help text in the Help Text column for the desired field.
- Save the changes.
Effective help text is concise and describes the expected format or content. For example:
- Date fields: “Enter manufacturer’s hardware warranty expiry (yyyy-mm-dd)”
- Network fields: “Enter valid IP address (x.x.x.x)” or “Enter valid MAC address (MM:MM:MM:SS:SS:SS)”
- Length-restricted fields: “Max 40 characters” or “Max 255 characters”
- Context-specific fields: “Enter vendor / installer job or reference number” or “Enter shelf number in AV rack”
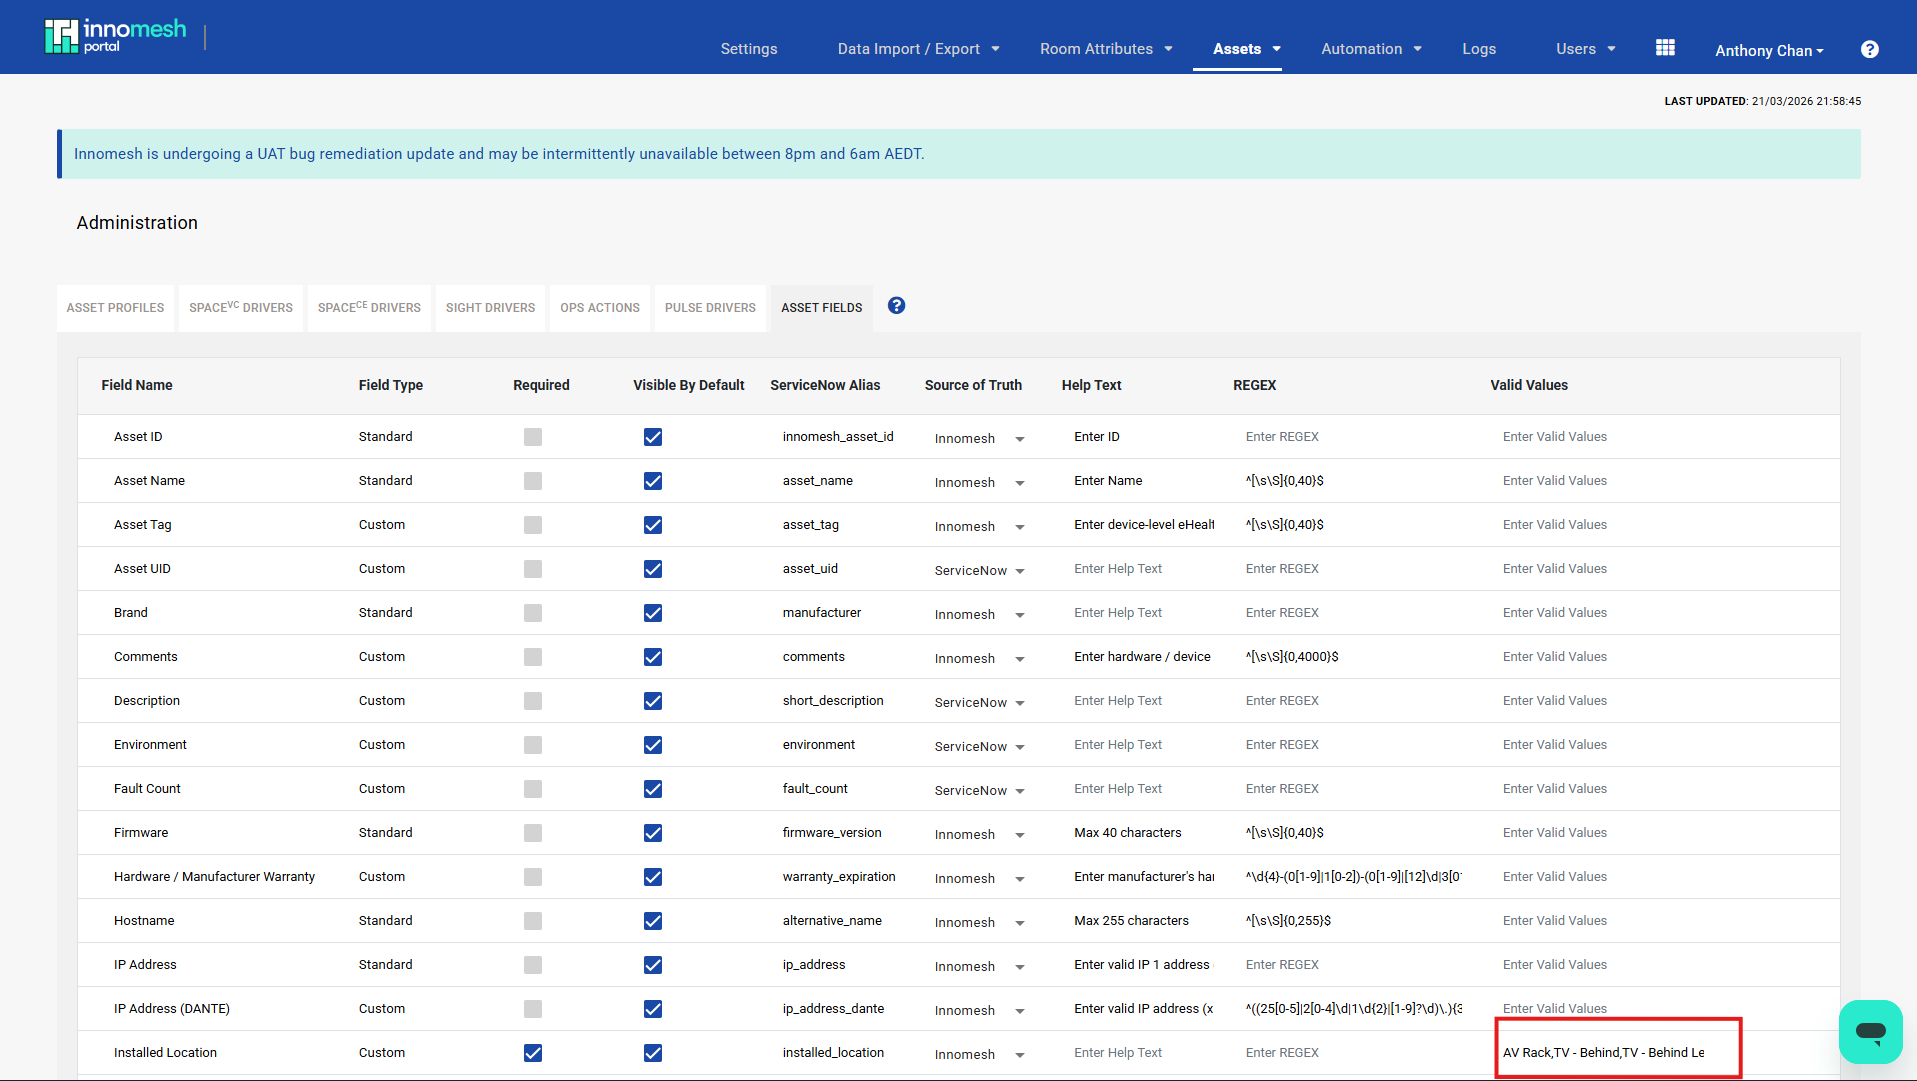
Valid Values (Dropdowns)
Where ServiceNow restricts a field to a specific set of allowed values (e.g., a choice list or picklist), configure the same values in the Valid Values column in Innomesh. When defined, the field appears as a dropdown in Room Manager instead of a free-text input, preventing users from entering values that ServiceNow would reject.
To configure valid values:
- Navigate to Assets → Asset Fields in Innomesh Portal Administration.
- Enter a comma-separated list of values in the Valid Values column.
- Save the changes.
For example, if ServiceNow only accepts specific mounting locations for devices, configure the Installed Location field with valid values such as AV Rack,TV - Behind,TV - Behind Left,TV - Behind Right,Ceiling,Wall,Table,Lectern. Users in Room Manager will then select from this list rather than typing freeform text.
Source of Truth and Read-Only Fields
Each asset field can be assigned a Source of Truth: either Innomesh or ServiceNow. When a field’s source of truth is set to ServiceNow, the field is displayed as read-only (greyed out) in Room Manager. This prevents users from overwriting values that are managed in ServiceNow.
Required Fields and Compliance Alerts
Marking an asset field as Required enables automated compliance checking. Once a day, Innomesh scans all devices to verify that required fields are populated.
If a device is missing a required field, an Asset Information Missing alert is raised on the Innomesh Hotlist at Notice severity. The alert includes:
- The room and zone the device belongs to.
- The device name and identifier.
- A list of the missing required fields.
The alert remains active as long as the required field is empty. Once the field is populated, the alert is automatically resolved within 26 hours.
Exporting Information to ServiceNow
In addition to importing data from ServiceNow, Innomesh also exports room and device information back to ServiceNow on a daily schedule. This ensures that data changes made in Innomesh are reflected in ServiceNow.
Room Information Export
Once a day, Innomesh sends updated room information to ServiceNow. This includes room information fields stored in Innomesh, as well as smart room attributes.
The export:
- Runs automatically overnight at a scheduled time configured for your tenancy, after the import from ServiceNow completes.
- Excludes any fields listed in the room information exclusion list (configurable by administrators).
Device Information Export
Similarly, Innomesh exports updated device information to ServiceNow once a day. This includes device attributes, custom asset fields, and asset profile fields.
The export:
- Runs automatically overnight at a scheduled time configured for your tenancy, after the import from ServiceNow completes.
- Excludes any fields listed in the device information exclusion list.
Export on Room Create and Update
In addition to the scheduled nightly export, room and device information is also exported to ServiceNow immediately when a room is created or updated. This includes:
- Notifying ServiceNow that the room has been created or updated.
- Sending device information for all linked devices in the room.
Device Swap-Out Detection
Device Swap-Out Detection identifies when a physical device has been replaced and automatically notifies ServiceNow. This supports asset management processes by flagging hardware changes that may require approval or tracking.
How Swap-Out Is Detected
A device is considered to be swapped out when either of the following changes is detected for a linked device:
- The device MAC address changes from one valid value to another.
- The device model changes from one valid value to another.
Detection occurs as part of the nightly device information push. When a swap-out is detected, Innomesh sends a notification to ServiceNow that includes the old Asset UID (renamed to swapped_device_uid) along with the new device details. The Asset UID is then cleared from the device in Innomesh, as the physical device has changed.
Automatic Asset UID Reassociation
After a device swap-out clears the Asset UID, Innomesh attempts to automatically reassociate the device with ServiceNow during the next scheduled device information pull. This occurs when:
- The device’s model and MAC address match a device record in ServiceNow.
- The device does not currently have an Asset UID in Innomesh.
When both conditions are met, the Asset UID is pulled from ServiceNow and linked to the device automatically, along with any other available device information. This eliminates the need for manual re-linking after an authorised device replacement.
Related Articles
Appendix: Field Alias Mapping
Field aliases control how Innomesh maps data between ServiceNow and Innomesh during synchronisation. Aliases are configured in two places:
| Field Type | Where to Configure | Description |
|---|---|---|
| Room Information Fields | Managed by Innomate/UXT Service Desk | Each room information field can have a ServiceNow Alias value set, which corresponds to the field name returned from ServiceNow. When ServiceNow returns room data, the alias is used to match ServiceNow fields to Innomesh room information fields. Lodge a ticket with the Innomate/UXT Service Desk to request changes to room information field aliases. |
| Asset Fields | Innomesh Portal → Assets → Asset Fields | Each asset field (both standard and custom) can have a ServiceNow Alias, which corresponds to the field name returned from ServiceNow. This is used for both the import of device data and the nightly scheduled sync. |
When ServiceNow returns a payload with field names (e.g., building_name, serial_number), Innomesh looks up each field name against the configured aliases to determine which Innomesh field to populate. Fields without a matching alias are ignored.
Appendix: Synchronisation Schedule
The following table summarises the automated synchronisation processes and their schedules:
| Process | Direction | Schedule | Description |
|---|---|---|---|
| Room Info Pull | ServiceNow → Innomesh | Overnight (configurable) | Pulls updated room information fields from ServiceNow and syncs to Innomesh rooms. |
| Device Info Pull | ServiceNow → Innomesh | Overnight (configurable) | Pulls updated device information from ServiceNow for linked devices. |
| Room Info Export | Innomesh → ServiceNow | Overnight (configurable, after import) | Exports room information and smart room attributes to ServiceNow. |
| Device Info Export | Innomesh → ServiceNow | Overnight (configurable, after import) | Exports device attributes and profile fields to ServiceNow. Also performs swap-out detection. |
| Required Field Check | Internal | Daily (configurable) | Checks all devices for missing required fields and raises alerts. |
| Room Rename | Internal | Ongoing | Processes queued room renames detected during the overnight sync. |
| Compliance Alert Resolution | Internal | Hourly | Compliance alerts are automatically cleared up to 1 hour after the underlying issue has been rectified. |
Appendix: Permissions
The following permissions are associated with the ServiceNow CMDB integration. These are managed through Innomesh’s role-based access control (RBAC) system via the Innomesh Portal Administration page.
| Permission | RBAC Section | Description |
|---|---|---|
| Create Custom Rooms | Room Manager → Rooms | Allows the user to bypass the room build approval process and create rooms using the standard workflow. Only available when Room Build Approval is enabled. |
Appendix: ServiceNow API Functions
The following table summarises the API functions that must be exposed on the ServiceNow side for Innomesh to call. These can be implemented as ServiceNow Scripted REST APIs or through any other mechanism that exposes the required functionality to Innomesh.
| API Function | Feature | Description |
|---|---|---|
| Get Room Approvals | Room Build Approval | Returns the list of rooms approved for creation in Innomesh, including room name, approved templates, approved user groups, and room metadata. |
| Notify Room Created | Room Build Approval | Accepts a notification from Innomesh that a room has been successfully created, including the room name, template, creation timestamp, and the user who created it. |
| Get Room Information | Room Information Synchronisation | Returns room information fields for one or more rooms, identified by their Configuration Item sys_id. Used both at onboarding and for nightly synchronisation. |
| Get Device Information | Device Information Synchronisation | Returns device information for all devices associated with a room, identified by the room’s Configuration Item sys_id. Used both at onboarding and for nightly synchronisation. |
| Update Room | Exporting Information to ServiceNow | Accepts updated room information fields from Innomesh for one or more rooms. Used for nightly exports and on room update. |
| Update Device | Exporting Information to ServiceNow / Device Swap-Out Detection | Accepts updated device information from Innomesh, or creates new device records. Also used to notify ServiceNow of device swap-outs (indicated by a swapped_device_uid field in the payload). |